Mazda 3 Service Manual: General Procedures (Steering)
Wheel and Tire Installation
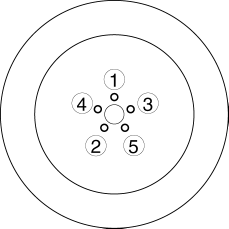
1. When installing the wheels and tires, tighten the wheel nuts in a criss-cross pattern to the following tightening torque.

-
Tightening torque
-
88—118 N·m {9.0—12 kgf·m, 65—87 ft·lbf}
Connector Disconnection
1. Disconnect the negative battery cable before performing any work that requires handling of connectors..
Suspension Links Removal/Installation
1. For the joint sections with rubber bushings, raise the vehicle using a lift, and then temporarily tighten the installation bolts and nuts. Lower the vehicle to the ground and tighten them completely with the specified torque.
Power Steering Related Parts Installation
1. If any power steering fluid line has been disconnected, perform the following after installation of the power steering components..
-
Power steering fluid amount inspection
-
Power steering fluid leakage inspection
-
Air bleeding
Electro Hydraulic Power Assist Steering (EHPAS) Related Parts
CAUTION:
-
If the configuration procedure is not completed, the EHPAS will not operate properly and it might cause an unexpected accident. Therefore, when replacing or removing the electric power steering oil pump component, make sure to perform the configuration procedure to ensure the proper EHPAS operation.
1. Make sure that there are no DTCs in the EHPAS memory after working on EHPAS related parts. If there are any codes in the memory, clear them.
2. When replacing or removing the electric power steering oil pump component, perform the configuration procedures..
 Steering
...
 Precaution
Intermittent Concern Troubleshooting
Vibration method
If a malfunction occurs or becomes worse while driving on a rough road or
when the engine is vibrating, perform the following steps.
...
Other materials:
Vacuum Line Inspection
MZR 2.0, MZR 2.5, MZR 2.3 DISI Turbo
1. Remove the vacuum hose..
2. Verify that air can be blown from the power brake unit side of the vacuum
hose towards the intake manifold side, and that air cannot be blown in the opposite
direction.
If there is any malfunction of the inner che ...
Volume/Display/Sound Controls
Volume adjustment
Turn the commander switch volume dial.
The volume switch on the steering switch
can also be pressed.
Display setting
Select the icon on the home
screen to
display the Settings screen.
Select the tab to select the item
you
would like to change.
Display OFF/Cloc ...
Towing
Proper lifting and towing are necessary to prevent damage to the vehicle.
Government and local laws must be followed.
A towed vehicle usually should have its drive wheel (front wheels) off the
ground. If excessive damage or other conditions prevent this, use wheel dollies.
...
