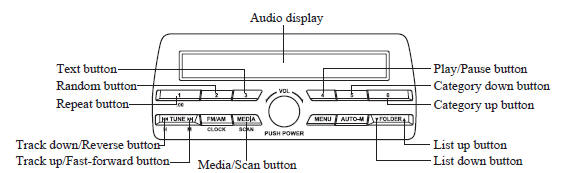
Mazda 3 Owners Manual: How to use iPod mode (Type A)
An iPod may not be compatible depending on the model or OS version. In this case, an error message is displayed.
NOTE The iPod functions on the iPod cannot be operated while it is connected to the unit because the unit controls the iPod functions.
Playback
- Switch the ignition to ACC or ON.
- Press the power/volume dial to turn the audio system on.
- Press the media button (
 ) to
) to
switch to the iPod mode and start playback.
NOTE
- When an iPod is not connected, the mode does not switch to the iPod mode.
- When there is no playable data in the iPod, “ NO CONTENTS ” is flashed.
- Do not remove the iPod while in the iPod mode. Otherwise, the data could be damaged.
Pause
To stop playback, press the play/pause button ( 4 ).
Press the button again to resume playback.
Fast-forward/Reverse
Press and hold the fast-forward button (
)
to advance through a track at high speed.
Press and hold the reverse button (
) to
reverse through a track at high speed.
Track search
Press the track up button ( )
)
once to skip
forward to the beginning of the next track.
Press the track down button (  )
)
within a
few seconds (depends on iPod software
version) after playback begins to track
down to the beginning of the previous
track.
Press the track down button ( )
)
after a
few seconds (depends on iPod software
version) have elapsed to start playback
from the beginning of the current track.
Category search
Press the category down button ( 5 ) to select the previous category and press the category up button ( 6 ) to select the next category.
NOTE The types of categories include Playlist, Artist, Album, Song, Podcast, Genre, Composer, and Audio book.
List search
Press the list down button ( )
)
to select the
previous list and press the list up button
(  ) to select the next list.
NOTE When the selected category is Song or Audio book, there is no list.
Music scan
This function scans the titles in a list currently being played and plays 10 seconds of each song to aid you in finding a song you want to listen to.
Press and hold the scan button ( )
)
during playback to start the scan play
operation (the track number will flash).
Press and hold the scan button (  )
)
again to cancel scan playback.
NOTE If the unit is left in scan, normal playback will resume where scan was selected.
Repeat playback
- Press the repeat button ( 1 ) during playback to play the current track repeatedly. “ TRACK RPT ” is displayed ( is displayed next to RPT at the bottom of the display area).
- Press the button again to cancel the repeat playback.
Random playback
Tracks are randomly selected and played.
Song random
- Press the random button ( 2 ) during
playback to play the tracks in the list
randomly. “ SONG RDM ” is displayed
(
 is displayed next to RDM at
the bottom of the display area). - To cancel the random playback, press the button again after 3 seconds.
Album random
- Press the random button ( 2 ) during
playback, and then press the button
again within 3 seconds to play the
tracks in the iPod randomly. “ ALBUM
RDM ” is displayed (
 is
is
displayed next to RDM at the bottom of the display area). - Press the button again to cancel the random playback.
NOTE The track number being played randomly is in the order of the iPod shuffle table.
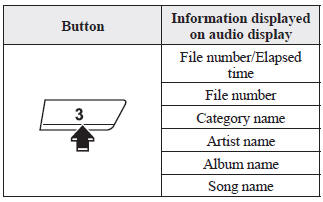
Switching the display
The information displayed on the audio display changes as follows each time the text button ( 3 ) is pressed during playback.
NOTE
- The information (artist name, music name) is displayed only when the iPod has information which can be displayed.
- This unit cannot display some
characters. Characters which cannot be
displayed are indicated by an asterisk
(
 ).
).
Display scroll
13 characters can be displayed at one time. To display the rest of the characters of a long title, press and hold the text button ( 3 ). The display scrolls the next 13 characters. Press and hold the text button ( 3 ) again after the last 13 characters have been displayed to return to the beginning of the title.
NOTE The number of characters which can be displayed is restricted.
Error Messages
If the message “ CHECK iPod ” is displayed, it indicates that there is a malfunction in the iPod. Verify that the content recorded in the iPod has playable files and connect correctly. If the message reappears, have the unit checked by an Authorized Mazda Dealer.
 How to use USB mode (Type A)
Type
Playable data
USB mode
MP3/WMA/AAC file
This unit does not support a USB 3.0
device. In addition, other devices may not
be supported depending on the mod ...
 Error Indications (Type A)
If you see an error indication on the
display, find the cause in the chart. If you
cannot clear the error indication, take the
vehicle to an Authorized Mazda Dealer.
Indication
C ...
Other materials:
Ignition Switch Inspection [Without Advanced Keyless Entry And Push Button Start
System]
1. Disconnect the negative battery cable..
2. Remove the column cover..
3. Remove the ignition switch..
4. Verify that the continuity between the ignition switch terminals is as indicated
in the table.
If not as indicated in the table, replace the ignition switch.
...
Blind Spot Monitoring (BSM) System
The Blind Spot Monitoring (BSM) system is designed to assist the driver in
checking the
area to the rear of the vehicle on both sides during lane changes by alerting
the driver to the
presence of vehicles approaching from the rear in an adjacent lane.
The Blind Spot Monitoring (BSM) system ...
Intake Air Temperature (Iat) Sensor Inspection [Mzr 2.0, Mzr 2.5]
Resistance Inspection
NOTE:
Because the IAT sensor is integrated in the MAF sensor, replacing the IAT
sensor includes replacement of the MAF/IAT sensor.
1. Remove the battery cover..
2. Disconnect the negative battery cable..
3. Disconnect the MAF/IAT sensor connector.
4. Mea ...
