Mazda 3 Owners Manual: AUX/USB/iPod mode
Audio can be heard from the vehicle's speakers by connecting a commerciallyavailable portable audio unit to the auxiliary jack.
A commercially-available, non-impedance (3.5 ) stereo mini plug cable is required.
Contact an Authorized Mazda Dealer for details.
In addition, audio can be played from the vehicle audio device by connecting a USB device or an iPod to the USB port.
NOTE (Type B) The SD card slot is for the navigation system. For vehicles with the navigation system, the SD card (Mazda genuine) with stored map data is inserted into the SD card slot and used.
Type A (Without CD player)
Type A (With CD player)
Type B (Without CD player)
Type B (With CD player)
- How to use AUX mode (Type A)
- How to use USB mode (Type A)
- How to use iPod mode (Type A)
- How to use AUX mode (Type B)
- How to use USB mode (Type B)
| WARNING Do not adjust the portable audio unit or a similar product while driving the vehicle: Adjusting the portable audio unit or a similar product while driving the vehicle is dangerous as it could distract your attention from the vehicle operation which could lead to a serious accident. Always adjust the portable audio unit or a similar product while the vehicle is stopped. |
CAUTION
|
NOTE
- This mode may not be usable depending on the portable audio device to be connected.
- Before using the auxiliary jack/USB port, refer to the instruction manual for the portable audio device.
- Use a commercially-available, nonimpedance (3.5 ) stereo mini plug for connecting the portable audio unit to the auxiliary jack. Before using the auxiliary jack, read the manufacturer's instructions for connecting a portable audio unit to the auxiliary jack.
- To prevent discharging of the battery, do not use the auxiliary input for long periods with the engine off or idling.
- When connecting a device to the auxiliary jack or USB port, noise may occur depending on the connected device. If the device is connected to the vehicle's accessory socket, the noise can be reduced by unplugging it from the accessory socket.
- How to connect USB port/ Auxiliary jack
- How to use AUX mode (Type A)
- How to use USB mode (Type A)
- How to use iPod mode (Type A)
- Error Indications (Type A)
- How to use AUX mode (Type B)
- How to use USB mode (Type B)
- Gracenote Database (Type B)
 Audio Control Switch Operation
Without Bluetooth ® Hands-Free
With Bluetooth ® Hands-Free
Adjusting the Volume
To increase the volume, press up the
volume switch ( +).
To decrease the volume, press down the
volume ...
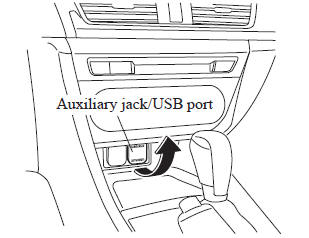
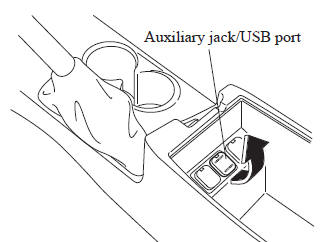
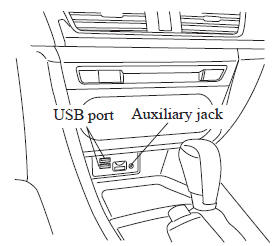
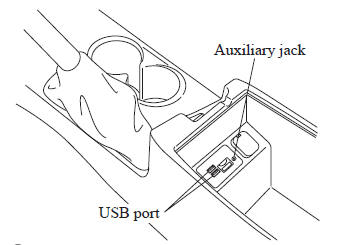
 How to connect USB port/ Auxiliary jack
Type A (Without CD player)
Type A (With CD player)
Type B (Without CD player)
Type B (With CD player)
Connecting a device
Open the console lid (with CD player).
If there is a ...
Other materials:
Shift Position Indication
The selector position is indicated when the
ignition is switched ON.
Gear position indication
In manual shift mode, the “M” of the shift
position indication illuminates and the
numeral for the selected gear is displayed.
Warning Light
The warning light turns on when the
system has a ma ...
Uniform Tire Quality Grading System
(UTQGS)
This information relates to the tire grading system developed by the U.S.
National Highway
Traffic Safety Administration for grading tires by tread wear, traction, and
temperature
performance.
Tread Wear
The tread wear grade is a comparative rating based on the wear rate of the
tire when t ...
Dehumidifying (With air
conditioner)
Operate the air conditioner in cool or cold
weather to help defog the windshield and
side windows.
Set the mode selector dial to the desired
position.
Set the air intake selector to the outside
air position.
Set the temperature control dial to the
desired position.
Set the fan cont ...
