Mazda 3 Owners Manual: Inspecting Engine Oil Level
- Be sure the vehicle is on a level surface.
- Warm up the engine to normal operating temperature.
- Turn it off and wait at least 5 minutes for the oil to return to the oil pan.
- Pull out the dipstick, wipe it clean, and reinsert it fully.
- Pull it out again and examine the level.
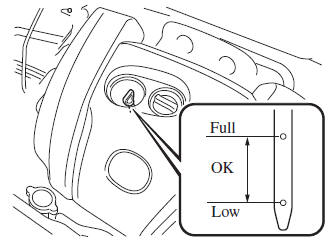
The level is normal if it is between Low and Full.
If it is near or below Low, add enough oil to bring the level to Full.
| CAUTION Do not overfi ll the engine oil. This may cause engine damage |
- Make sure the O-ring on the dipstick is positioned properly before reinserting the dipstick.
- Reinsert the dipstick fully.
 Vehicle Engine Control Unit Reset Procedure
NOTE
This procedure is intended for vehicles with the engine oil flexible
maintenance setting
selected.
After replacing the engine oil, have a repair shop such as an Authorized
Mazda Dealer
pe ...
 Engine Coolant
Inspecting Coolant Level
WARNING
Do not use a match or live fl ame in the
engine compartment. DO NOT ADD
COOLANT WHEN THE ENGINE IS HOT:
A hot engine is dangerous. If the
engine ...
Other materials:
Camshaft Position (CMP) Sensor Inspection [Mzr 2.0, Mzr 2.5]
Visual Inspection
CAUTION:
When replacing the CMP sensor, make sure there is no foreign material on
it such as metal shavings. If it is installed with foreign material, the sensor
output signal will malfunction resulting from fluctuation in magnetic flux and
cause a deterioration i ...
Fuel Filler Lid Opener Bezel Removal/Installation
1. Remove the screw.
2. Pull the fuel-filler lid opener bezel in the direction of the arrow (1) then
remove the tab.
3. Move the fuel-filler lid opener bezel in the direction of the arrow (2) shown
in the figure.
4. Remove the fuel-filler lid opener bezel.
5. Install in the rever ...
List of storage features
Location of the storage features
Bottle holders
Card holders
Cup holders
Auxiliary box (if equipped)
Console box
Open tray
WARNING
■ Items that should not be left in the vehicle
Do not leave glasses, aerosol cans, or similar items inside the Subaru Solterra
storage co ...
