Mazda 3 Service Manual: Key Reminder Switch Removal/Installation
1. Disconnect the negative battery cable. (See BATTERY REMOVAL/INSTALLATION [MZR 2.0, MZR 2.5].)(See BATTERY REMOVAL/INSTALLATION [MZR 2.3 DISI Turbo].)(See BATTERY REMOVAL/INSTALLATION [SKYACTIV-G 2.0].)
2. Remove the column cover. (See COLUMN COVER REMOVAL/INSTALLATION.)
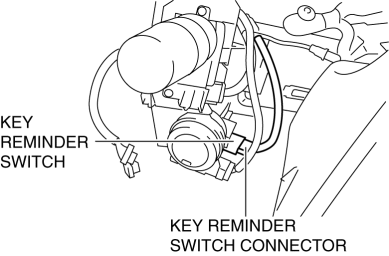
3. Disconnect the key reminder switch connector.

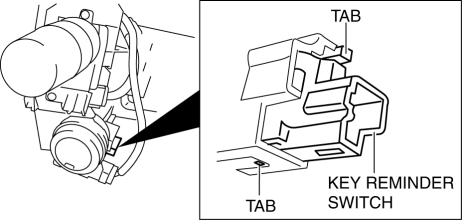
4. Detach the key reminder switch tabs.

5. Remove the key reminder switch.
6. Install in the reverse order of removal.
 Key Reminder Switch Inspection
1. Disconnect the negative battery cable. (See BATTERY REMOVAL/INSTALLATION [MZR
2.0, MZR 2.5].)(See BATTERY REMOVAL/INSTALLATION [MZR 2.3 DISI Turbo].)(See BATTERY
REMOVAL/INSTALLATION [SKYACTIV- ...
 Power Systems Personalization Features Setting Procedure
NOTE:
Use the IDS (laptop PC) because the PDS (Pocket PC) does not support the
POWER SYSTEMS PERSONALIZATION FEATURES SETTING PROCEDURE.
1. Connect the M-MDS to the DLC–2.
2. Af ...
Other materials:
Front Seat Back Component [Vehicles Without Power Seat System] Removal/Installation
WARNING:
Handling a front seat (with built-in side air bag) improperly can accidentally
operate (deploy) the air bag, which may seriously injure you. Read the service
warnings before handling a front seat (with built-in side air bag)..
CAUTION:
After removing a front seat ...
Customer Assistance
(Puerto Rico)
Your complete and permanent satisfaction is our business. That is why all
Authorized Mazda
Dealers have the knowledge and the tools to keep your Mazda vehicle in top
condition.
If you have any questions or recommendations for improvement regarding the
service of
your Mazda vehicle or serv ...
Changing a Flat Tire
NOTE
If the following occurs while driving, it
could indicate a flat tire.
Steering becomes difficult.
The vehicle begins to vibrate
excessively.
The vehicle pulls in one direction.
If you have a flat tire, drive slowly to a
level spot that is well off the road and out
of the way of ...
