Mazda 3 Service Manual: Liftgate Hinge Removal/Installation
1. Disconnect the negative battery cable..
2. Remove the following parts:
a. Rear scuff plate.
b. Rear seat cushion.
c. Rear seat back.
d. Lower anchor installation bolts on the rear seat belt.
e. Tire house trim.
f. Trunk end trim.
g. Trunk side upper trim.
h. Trunk side trim.
i. C-pillar trim.
j. Rear assist handle.
k. Liftgate.
3. Remove the nut while partially peeling back the headliner.
NOTE:
-
Be careful not to leave a fold-seam.
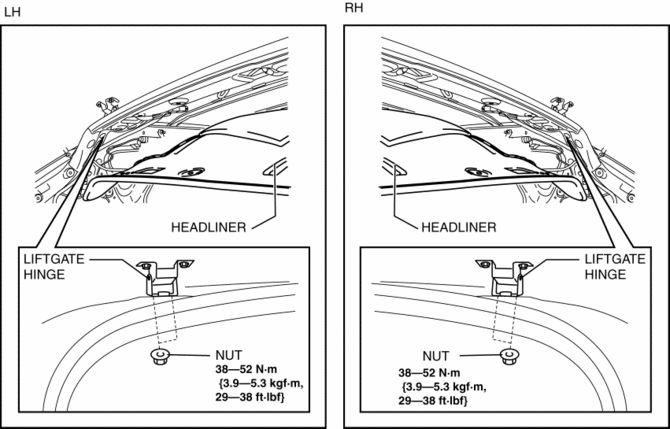
4. Remove the liftgate hinge.
5. Install in the reverse order of removal.
 Liftgate Adjustment
1. Measure the gap and height difference between the liftgate and the body.
2. Loosen the liftgate hinge installation bolts and adjust the gap by moving
the liftgate.
Standard clearance
...
 Liftgate Latch And Lock Actuator Inspection
1. The following actuator and switch are integrated with the liftgate latch and
lock actuator. Inspect the liftgate latch and lock actuator according to each inspection
procedure for the following ...
Other materials:
Roof Molding Removal
1. Insert a fastener remover in the position shown in the figure.
2. Rotate the flathead screwdriver in the direction of the arrow (1) shown in
the figure and remove the roof molding from the T-stud (figure A).
3. Rotate the roof molding in the direction of the arrow (2) shown in the figure,
...
Voice Recognition (Type B)
In this section, the basic operation of the
voice recognition is explained.
Activating Voice Recognition
Press the talk button.
Ending Voice Recognition
Use one of the following methods:
Press the hang-up button.
Say, “Cancel”.
Operate the commander switch or the
center display (o ...
Declaration of Conformity
Keyless Entry System/Immobilizer System
Blind Spot Monitoring (BSM) System
NOTE
During printing time of this user manual the approvals listed above are granted.
WARNING
Change or modifi cations not expressively approved by the party
responsible for
compliance could voi ...
