
Mazda 3 Service Manual: Liftgate Opener Switch Inspection
1. Disconnect the negative battery cable..
2. Remove the following parts:
a. Liftgate upper trim.
b. Liftgate side trim.
c. Liftgate lower trim.
d. Liftgate latch and lock actuator.
e. Liftgate opener switch.
3. Verify the continuity of liftgate opener switch terminals A and B.
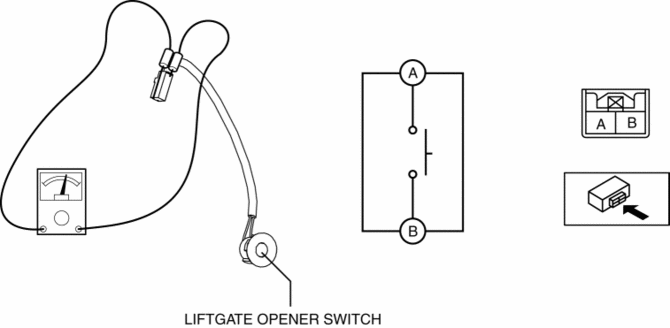
4. Verify that the continuity is as indicated in the table.
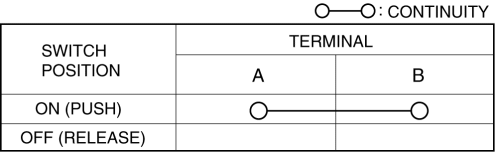
-
If not as indicated in the table, replace the liftgate opener switch.
 Liftgate Lower Trim Removal/Installation
1. Remove the liftgate upper trim..
2. Remove the liftgate side trim..
3. Remove the screw and fasteners.
4. Pull the liftgate lower trim in the direction of arrow (1), (2), (3), then
deta ...
 Liftgate Opener Switch Removal/Installation
1. Disconnect the negative battery cable..
2. Remove the following parts:
a. Liftgate upper trim.
b. Liftgate side trim.
c. Liftgate lower trim.
d. Liftgate latch and lock actuator.
3. Dis ...
Other materials:
Seat Warmer Unit Inspection
WARNING:
Handling a front seat (with built-in side air bag) improperly can accidentally
operate (deploy) the air bag, which may seriously injure you. Read the service
warnings before handling a front seat (with built-in side air bag)..
CAUTION:
After removing a front seat ...
Control Valve Body Removal/Installation [FS5 A EL]
Primary Control Valve Body On-Vehicle Removal
WARNING:
A hot transaxle and ATF can cause severe burns. Turn off the engine and wait
until they are cool.
Using compressed air can cause dirt and other particles to fly out, causing
injury to the eyes. Wear protective eyeglasses w ...
Drive Plate Removal/Installation [Fw6 A EL]
1. Remove the transaxle..
2. Remove in the order indicated in the table.
1
Drive plate installation bolts
(See Drive Plate Installation Bolts Removal Note.)
(See Drive Plate Installation Bolts Installation Note.)
2
Backing plate
...
