Mazda 3 Service Manual: Liftgate Upper Trim Removal/Installation
1. Detach tab while pulling the liftgate upper trim in the direction of the arrow (1) shown in the figure, then detach clips and pin while pulling in the direction of the arrow (2).

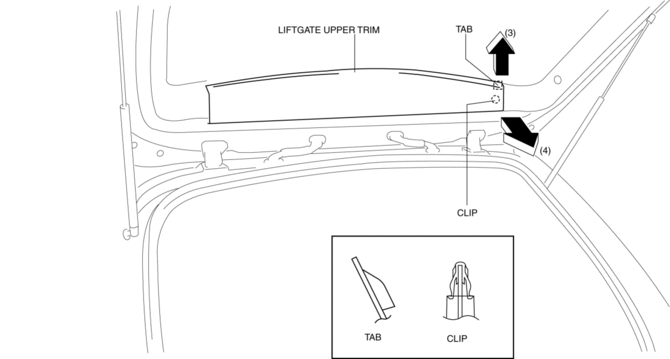
2. Detach tab while pulling the liftgate upper trim in the direction of the arrow (3) shown in the figure, then detach clip while pulling in the direction of the arrow (4).
3. Remove the liftgate upper trim.
4. Install in the reverse order of removal.
 Liftgate Side Trim Removal/Installation
1. Remove the liftgate upper trim..
2. Pull the point A of the strap hanger as shown in the figure.
3. Remove the strap hanger.
4. Remove the fastener.
5. Pull the liftgate side trim in th ...
 Rear Door Checker Removal/Installation
1. Fully close the rear door glass.
2. Disconnect the negative battery cable..
3. Remove the rear door trim..
4. Remove the rear door speaker..
5. Remove the bolt A.
6. Remove the bolts ...
Other materials:
Manifold Absolute Pressure (Map) Sensor/Intake Air Temperature (Iat) Sensor
No.2 Removal/Installation [Skyactiv G 2.0]
NOTE:
Because the IAT sensor No.2 is integrated in the MAP sensor, replacing the
IAT sensor No.2 includes replacement of the MAP sensor/IAT sensor No.2.
1. Remove the battery cover..
2. Disconnect the negative battery cable..
3. Disconnect the MAP sensor/IAT sensor No.2 connecto ...
Windshield wipers and washer
The Subaru Solterra windshield wiper system offers both automatic
rain-sensing operation and manual control, allowing precise adjustment for various
weather conditions. The washer system can also be activated for effective cleaning
of the windshield.
NOTICE
■ When the windshield is dry
Do ...
Washer Motor Removal/Installation
4SD
1. Disconnect the negative battery cable..
2. Remove the front mudguard (RH)..
3. Remove in the order indicated in the table.
1
Windshield washer hose
2
Washer motor connector
3
Washer motor
...
