
Mazda 3 Service Manual: Afs (Adaptive Front Lighting System) Off Switch Removal/Installation
1. Disconnect the negative battery cable..
2. Remove the switch panel in the direction of the arrow shown in the figure.
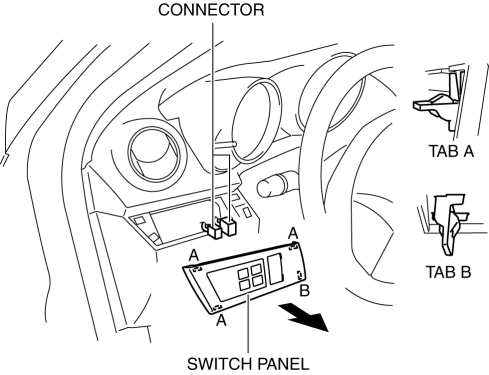
3. Disconnect the connector.
4. Remove the AFS OFF switch in the direction of the arrow (2) shown in the figure while pressing the tabs in the direction of the arrow (1).
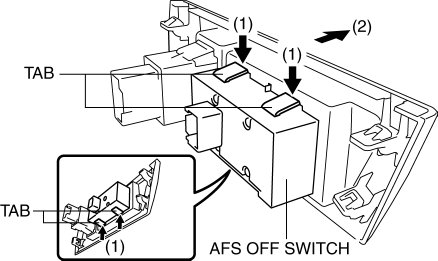
5. Remove the AFS OFF switch.
6. Install in the reverse order of removal.
 Afs (Adaptive Front Lighting System) Off Switch Inspection
1. Disconnect the negative battery cable..
2. Remove the AFS OFF switch..
3. Verify that the continuity between the AFS OFF switch terminals is as indicated
in the table.
If the cont ...
 Back Up Light Bulb Removal/Installation
4SD
1. Disconnect the negative battery cable..
2. Remove the trunk rid trim..
3. Disconnect the connector.
4. Rotate the socket in the direction of the arrow as shown in the figure to
rem ...
Other materials:
Map Light Inspection
1. Disconnect the negative battery cable..
2. Remove the map light..
3. Verify that the continuity between the map light terminals is as indicated
in the table.
If not as indicated in the table, inspect the bulb. If there is no malfunction,
replace the map light.
4. ...
Blind Spot Monitoring (Bsm) Control Module Inspection
1. Disconnect the negative battery cable.
2. Remove the rear combination light..
3. Remove the rear bumper..
4. Connect the negative battery cable..
5. Measure the voltage at each terminal is as indicated in the Terminal Voltage
Tables.
If the voltage or continuity is not as specif ...
Entertainment Personalization Features Setting Procedure
Welcome Mode ON/OFF Setting
NOTE:
WELCOME mode is controlled by the instrument cluster. Refer to the instrument
cluster description.
1. Refer to INSTRUMENTATION/DRIVER INFO. PERSONALIZATION FEATURES SETTING PROCEDURE.
Welcome Sound ON/OFF Setting
1. Switch the ignition to ACC o ...
