Mazda 3 Service Manual: Manual Transaxle Oil Replacement [C66 M R]
1. Park the vehicle on level ground.
2. Remove the aerodynamic under cover No.2..
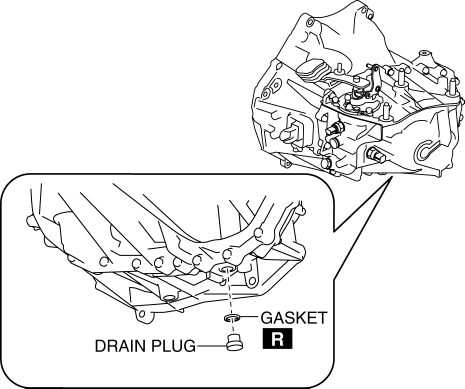
3. Remove the drain plug and gasket, and drain the manual transaxle oil.

4. Install a new gasket and the drain plug.
-
Tightening torque
-
39—59 N·m {4.0—6.0 kgf·m, 29—43 ft·lbf}
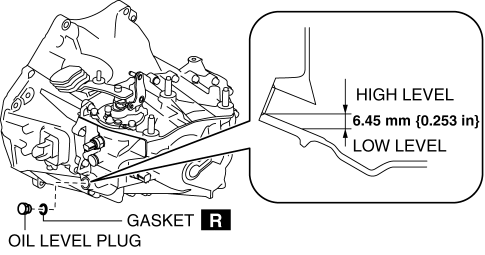
5. Remove the oil level plug and gasket.

6. Add the specified manual transaxle oil through the oil level plug port.
-
Manual transaxle oil grade
-
API service GL-4
-
Manual transaxle oil viscosity
-
SAE 75W-80
7. Install a new gasket and the oil level plug.
-
Tightening torque
-
39—59 N·m {4.0—6.0 kgf·m, 29—43 ft·lbf}
8. Install the aerodynamic under cover No.2..
 Manual Transaxle Oil Inspection [C66 M R]
1. Park the vehicle on level ground.
2. Remove the aerodynamic under cover No.2..
3. Remove the oil level plug and gasket.
Tightening torque
39—59 N·m {4.0—6.0 kgf·m, 29—43 ft·lbf}
...
 Manual Transaxle Removal/Installation [A26 M R]
CAUTION:
Secure the steering wheel using tape or a cable to prevent the steering shaft
from rotating after disconnecting the steering shaft. If the steering wheel
rotates after the steer ...
Other materials:
Manual Transaxle Shift Mechanism Removal/Installation [A26 M R]
1. Remove the battery cover..
2. Disconnect the negative battery cable.
3. Remove the battery and battery tray..
4. Remove the air cleaner and air inlet hose..
5. Remove the aerodynamic under cover NO.2..
6. Remove the tunnel member (rear)..
7. Remove the upper panel..
8. Remove the sh ...
Decoration Panel Removal/Installation
1. Remove the following parts:
a. Passenger-side front scuff plate.
b. Passenger-side front side trim.
c. Glove compartment.
d. Passenger-side lower panel.
2. Remove the screw.
3. Pull the decoration panel in the direction of the arrow (1), (2) shown in
the figure, while remove the hoo ...
Rear Lower Arm Removal/Installation
1. Disconnect the auto leveling sensor link lower side. (Vehicles with AFS).
2. Remove in the order indicated in the table.
3. Install in the reverse order of removal.
4. Inspect the wheel alignment and adjust it if necessary..
1
Rear coil spring component
.
...
