Mazda 3 Service Manual: Oil Control Valve (OCV) Inspection [Mzr 2.0, Mzr 2.5]
Coil Resistance Inspection
1. Remove the battery cover..
2. Disconnect the negative battery cable..
3. Remove the plug hole plate..
4. Disconnect the OCV connector.
5. Measure the resistance between terminals A and B using an ohmmeter.

-
OCV coil resistance
-
6.9—7.9 ohms [20°C {68°F}]
-
If not as specified, replace the OCV..
6. Install in the reverse order of removal.
Spool Valve Operation Inspection
1. Remove the OCV..
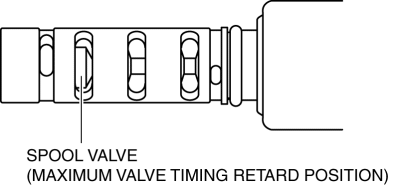
2. Verify that the spool valve in the OCV is in the maximum valve timing retard position as indicated in the figure.
-
If not as specified, replace the OCV..
3. Verify that the battery is fully charged..
-
If not as specified, recharge the battery..
NOTE:
-
When applying battery positive voltage between the OCV terminals, the connection can be either of the following:
-
Positive battery cable to terminal A, negative battery cable to terminal B
-
Positive battery cable to terminal B, negative battery cable to terminal A
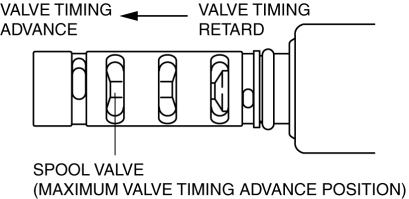
4. Apply battery positive voltage between the OCV terminals and verify that the spool valve operates and moves to the maximum valve timing advance position.
-
If not as specified, replace the OCV..
5. Stop applying battery positive voltage and verify that the spool valve returns to the maximum valve timing retard position.
-
If not as specified, replace the OCV..
6. Install the OCV..
 Front Oil Seal Replacement [Mzr 2.0, Mzr 2.5]
1. Remove the battery cover..
2. Disconnect the negative battery cable..
3. Remove the plug hole plate..
4. Disconnect the wiring harness.
5. Remove the ignition coils..
6. Remove the spark ...
 Oil Control Valve (OCV) Removal/Installation [Mzr 2.0, Mzr 2.5]
1. Remove the battery cover..
2. Disconnect the negative battery cable..
3. Remove the plug hole plate..
4. Disconnect the wiring harness.
5. Remove the ignition coils..
6. Remove the ventil ...
Other materials:
Clutch Fluid Leakage Inspection [C66 M R]
CAUTION:
Do not allow clutch fluid get on a painted surface. Clutch fluid contains
properties which can dissolve the paint. If clutch fluid gets on a painted surface,
wash it off with water immediately and wipe the area off completely.
1. Pump the clutch pedal a few times.
2. I ...
Camshaft Position (CMP) Sensor Inspection [Mzr 2.0, Mzr 2.5]
Visual Inspection
CAUTION:
When replacing the CMP sensor, make sure there is no foreign material on
it such as metal shavings. If it is installed with foreign material, the sensor
output signal will malfunction resulting from fluctuation in magnetic flux and
cause a deterioration i ...
Antenna Feeder No.3 Inspection
4SD (With Audio System (With Display))
1. Disconnect the negative battery cable..
2. Remove the rain sensor cover. (Vehicles with auto light/wiper system).
3. Disconnect the rain sensor connector. (Vehicles with auto light/wiper system)
4. Partially peel back the seaming welts.
5. Remove t ...
