Mazda 3 Service Manual: Oil Seal (Control Valve Body) Replacement [Fw6 A EL]
1. Remove the battery cover..
2. Disconnect the negative battery cable..
3. Remove the air cleaner component..
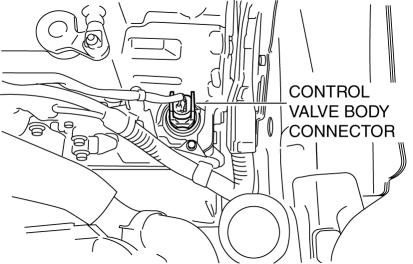
4. Disconnect the control valve body connector.
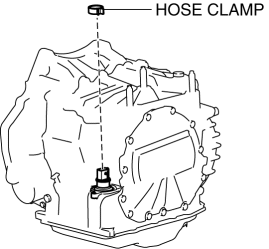
5. Remove the hose clamp.
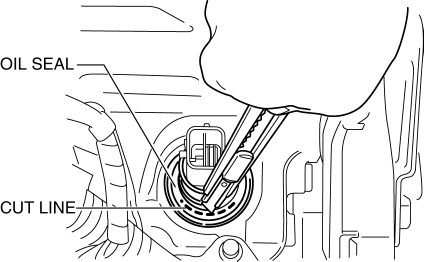
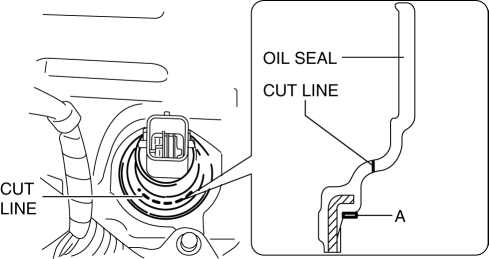
6. Cut the oil seal using a utility knife as shown in the following illustration.
CAUTION:
-
Do not damage the transaxle case.
-
Do not damage the control valve body coupler connector.
-
To prevent foreign matter penetration, clean the oil seal part before cutting the oil seal.
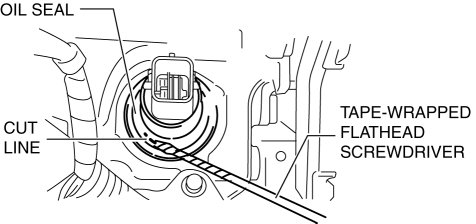
7. Using a tape-wrapped flathead screwdriver, remove the oil seal from the transaxle case.
NOTE:
-
Remove the oil seal by tapping the tip of a tape-wrapped flathead screwdriver on the inner circumference surface A area of the oil seal.
8. Temporarily install the oil seal (control valve body) by hand.
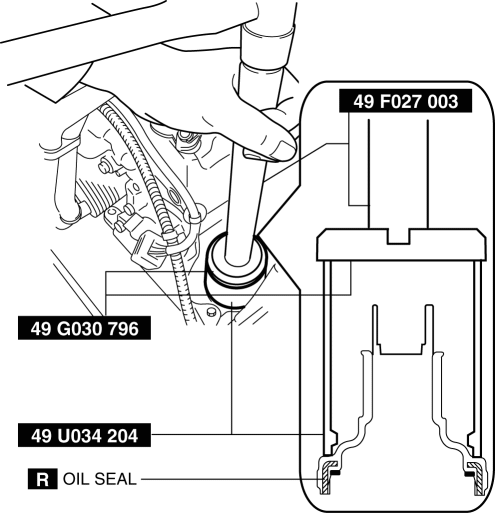
9. Using the SSTs
and a hammer, install the oil seal (control valve body) so that it is not tilted and there is no height difference between the transaxle case surface and the end surface of the oil seal.
CAUTION:
-
When installing the oil seal (control valve body), do not mistakenly hit the control valve body connector with the hammer. Otherwise the control valve body connector could be damaged making it no longer waterproof.
10. Install a new hose clamp to the position shown in the figure.
CAUTION:
-
If the hose clamp is reused it could cause ATF leakage, therefore use a new hose clamp.
-
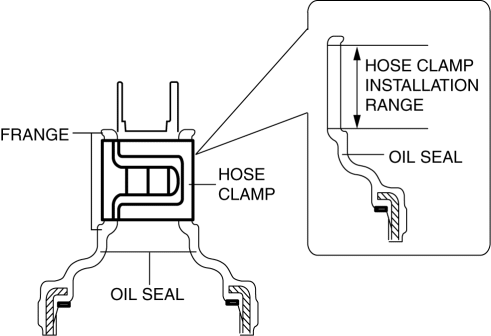
Install the hose clamp tab to within the range shown in the figure.
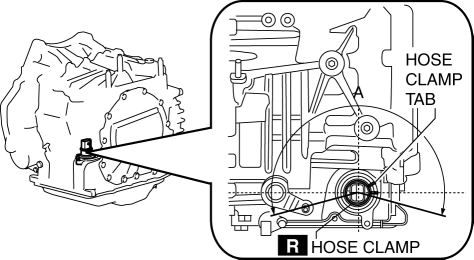
A:210°
CAUTION:
-
Install the hose clamp so that it does not interfere with the top and bottom flanges of the oil seal to maintain the waterproofing integrity.
11. Connect the control valve body connector.
CAUTION:
-
Make sure that your hand does not touch the terminal as the connector terminal could be damaged.
-
Verify that there is no fluid or foreign matter adhering to the connector before connecting the connector.
-
Insert the connector straight as the connector terminal could be damaged.
-
Rotate the connector lever until a click is heard.

12. Install the air cleaner component..
13. Connect the negative battery cable..
14. Install the battery cover..
 Oil Pump Removal/Installation [Mzr 2.0, Mzr 2.5]
WARNING:
Hot engines and engine oil can cause severe burns. Turn off the engine and
wait until it and the engine oil have cooled.
A vehicle that is lifted but not securely supported ...
 Oil Seal (Differential) Replacement [A26 M R]
1. On level ground, jack up the vehicle and support it evenly on safety stands.
2. Drain the oil from the transaxle..
3. Remove the front tires..
4. Remove the splash shield..
5. Remove the a ...
Other materials:
Vanity Mirror Illumination Inspection
1. Disconnect the negative battery cable..
2. Remove the sunvisor..
3. Verify that the continuity between the vanity mirror illumination terminals
is as indicated in the table.
If not as indicated in the table, inspect the bulb. If there is no malfunction,
replace the sunvisor.
...
Receiver/Drier Removal/Installation
MZR 2.0, MZR 2.5, SKYACTIV-G 2.0
1. Disconnect the negative battery cable..
2. Discharge the refrigerant..
3. Remove the aerodynamic under cover No.2..
4. Remove the aerodynamic under cover No.1..
5. Remove the front bumper..
6. Disconnect the block joint type pipes by grasping female sid ...
Locking, Unlocking with Request
Switch (With the advanced keyless
function)
All doors and the liftgate can be locked/
unlocked by pressing the request switch
on the front doors while the key is being
carried.
(5–door)
The request switch on the liftgate can only
be used to lock all doors and the liftgate.
Front doors
Liftgate (5-door Lock only)
To lock
To l ...
