Mazda 3 Service Manual: Oil Seal (Differential) Replacement [A26 M R]
1. On level ground, jack up the vehicle and support it evenly on safety stands.
2. Drain the oil from the transaxle..
3. Remove the front tires..
4. Remove the splash shield..
5. Remove the aerodynamic under cover No.2..
6. Separate the drive shaft and joint shaft from the transaxle..
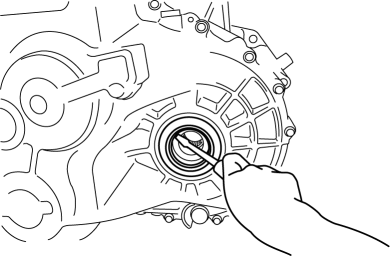
7. Remove the oil seals using a screwdriver.

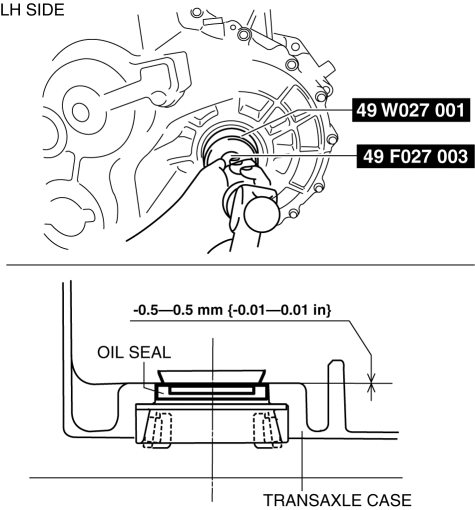
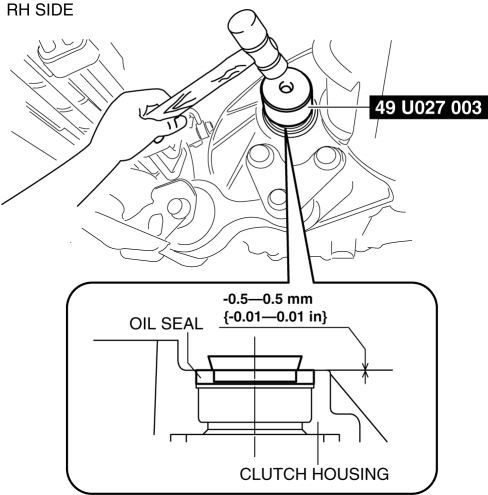
8. Using the SSTs
and a hammer, tap each new oil seal in evenly until the SSTs
contact the transaxle case.


9. Coat the lip of each oil seal with transaxle oil.
10. Insert the drive shaft and joint shaft to the transaxle..
11. Install the aerodynamic under cover No.2..
12. Install the splash shield..
13. Install the front tires..
14. Add the specified amount and type of oil..
 Oil Seal (Control Valve Body) Replacement [Fw6 A EL]
1. Remove the battery cover..
2. Disconnect the negative battery cable..
3. Remove the air cleaner component..
4. Disconnect the control valve body connector.
5. Remove the hose clamp.
...
 Oil Seal (Differential) Replacement [C66 M R]
1. Remove the aerodynamic under cover No.2 and the splash shield as a single
unit..
2. Drain the manual transaxle oil..
3. Disconnect the drive shaft (LH) from the MTX..
4. Disconnect the driv ...
Other materials:
Brakes SST
49 D043 0A0
Adapter set
49 U043 0A0A
Oil pressure gauge set
49 0221 600C
Disc brake expand tool
49 B033 001
Installer
49 G033 102
Handle
...
Gps Antenna Feeder Removal/Installation
With Audio Unit (Without Display)
NOTE:
GPS antenna feeder is removed with the multi information display.
1. Refer to MULTI INFORMATION DISPLAY REMOVAL/INSTALLATION.
With Audio Unit (With Display)
NOTE:
GPS antenna feeder is removed with the antenna feeder No.4.
1. Re ...
Outer Mirror Glass Installation
1. Connect the mirror heater connectors. (Vehicles with heated outer mirrors)
2. Connect the BSM indicator light connector. (Vehicles with BSM system)
3. Press part C on the outer mirror glass and install pin C.
4. Press part A on the outer mirror glass and install pins A.
5. Press part ...
