Mazda 3 Service Manual: Oil Seal (Differential) Replacement [Fw6 A EL]
1. Remove the aerodynamic under cover No.2 and the splash shield as a single unit..
2. Remove the oil seal.
a. Drain the ATF..
b. Disconnect the drive shaft (LH) from the transaxle..
c. Disconnect the drive shaft (RH) from the joint shaft..
d. Remove the joint shaft..
CAUTION:
-
The oil seal is easily damaged by the sharp edges of the drive shaft splines. Do not let the splines contact the oil seal.
e. Remove the oil seal using a flathead screwdriver.
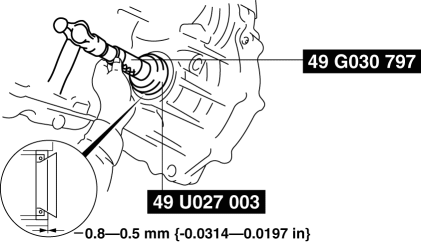
3. Using the SSTs
and a hammer, tap a new oil seal in evenly until the SST
(49 U027 003
) contacts the transaxle case.
4. Coat the lip of the oil seal with ATF.
5. Install the joint shaft..
6. Install the drive shaft (RH) to the joint shaft..
7. Install the drive shaft (LH) to the transaxle..
8. Add the ATF..
9. Install the aerodynamic under cover No.2 and the splash shield as a single unit..
10. Perform the “Mechanical System Test”..
 Oil Seal (Differential) Replacement [C66 M R]
1. Remove the aerodynamic under cover No.2 and the splash shield as a single
unit..
2. Drain the manual transaxle oil..
3. Disconnect the drive shaft (LH) from the MTX..
4. Disconnect the driv ...
 Oil Seal (Differential) Replacement [G35 M R]
1. On level ground, jack up the vehicle and support it evenly on safety stands.
2. Remove the aerodynamic under cover No.2..
3. Drain the oil from the transaxle..
4. Remove the front splash shi ...
Other materials:
Trunk Lid Opener Switch Inspection
1. Disconnect the negative battery cable..
2. Remove the trunk lid trim..
3. Remove the high-mount brake light..
4. Remove the trunk lid opener switch..
5. Verify the continuity of trunk lid opener switch terminals A and B.
6. Verify that the continuity is as indicated in the table.
...
Transaxle Oil Replacement [G66 M R]
1. Park the vehicle on level ground.
2. Remove the aerodynamic under cover No.2..
3. Remove the drain plug and washer.
4. Drain the oil into a suitable container.
5. Install a new washer and the drain plug.
Tightening torque
39—59 N·m {4.0—6.0 kgf·m, 29—43 ft·lbf}
...
M Position Switch Inspection [FS5 A EL]
1. Perform the following procedures.
a. Remove the battery cover..
b. Disconnect the negative battery cable.
c. Remove the console..
d. Disconnect the selector lever component connector.
2. Inspect the continuity between the selector lever component terminals A and
H.
If ...
