
Mazda 3 Service Manual: Oil Seal (Differential) Replacement [G66 M R]
1. On level ground, jack up the vehicle and support it evenly on safety stands.
2. Remove the aerodynamic under cover No.2..
3. Drain the oil from the transaxle..
4. Remove the front splash shield..
5. Separate the drive shaft and joint shaft from the transaxle..
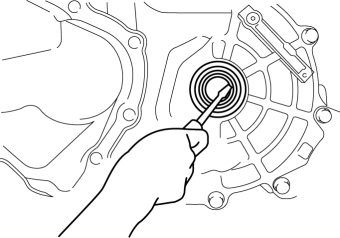
6. Remove the oil seals using a screwdriver.
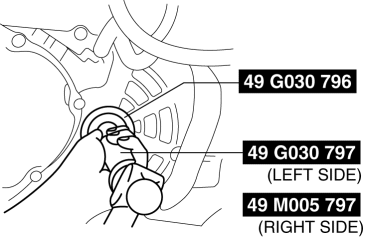
7. Using the SSTs
and a hammer, tap each new oil seal in evenly until the SST
contacts the transaxle case.
8. Coat the lip of each oil seal with transaxle oil.
9. Insert the drive shaft and joint shaft to the transaxle..
10. Install the front splash shield..
11. Add the specified amount and type of oil..
12. Install the aerodynamic under cover No.2..
 Oil Seal (Differential) Replacement [G35 M R]
1. On level ground, jack up the vehicle and support it evenly on safety stands.
2. Remove the aerodynamic under cover No.2..
3. Drain the oil from the transaxle..
4. Remove the front splash shi ...
 Oil Seal Replacement [FS5 A EL]
1. Remove the aerodynamic under cover No. 2..
2. Remove the oil seal.
a. Drain the ATF..
b. Remove the drive shaft and/or joint shaft..
CAUTION:
The oil seal is easily damaged by the s ...
Other materials:
PID/Data Monitor Inspection [Bcm]
1. Connect the M-MDS (IDS) to the DLC-2.
2. After the vehicle is identified, select the following items from the initialization
screen of the IDS.
a. Select “DataLogger”.
b. Select “Modules”.
c. Select “BCM/GEM”.
3. Select the applicable PID from the PID table.
4. Verif ...
Evaporator Temperature Sensor Inspection [Manual Air Conditioner]
NOTE:
Inspect the evaporator temperature sensor when it is installed to the A/C
unit.
1. Set the fan speed MAX HI.
2. Set the temperature control at MAX COLD.
3. Set the RECIRCULATE mode.
4. Turn the A/C switch off.
5. Close all doors and windows.
6. Wait for 5 min.
7. D ...
Gps Antenna Feeder Removal/Installation
With Audio Unit (Without Display)
NOTE:
GPS antenna feeder is removed with the multi information display.
1. Refer to MULTI INFORMATION DISPLAY REMOVAL/INSTALLATION.
With Audio Unit (With Display)
NOTE:
GPS antenna feeder is removed with the antenna feeder No.4.
1. Re ...
