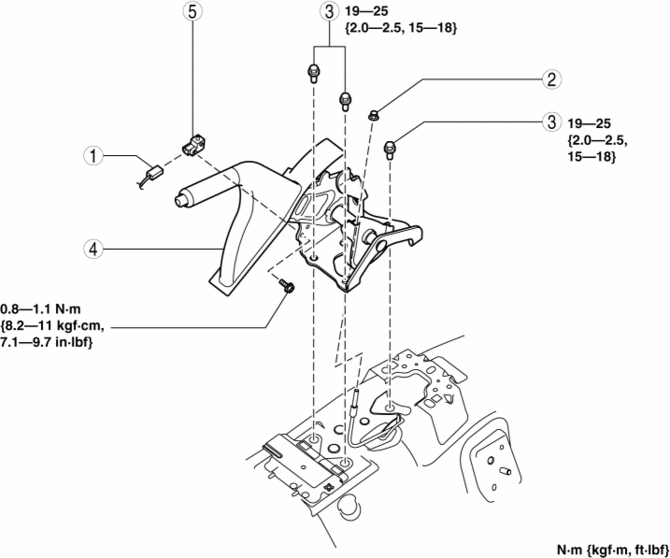
Mazda 3 Service Manual: Parking Brake Lever Removal/Installation
1. Remove the following parts:
a. Upper panel.
b. Shift knob (MTX).
c. Selector lever knob (ATX).
d. Shift panel.
e. Side wall.
f. Console.
2. Remove in the order indicated in the table.
3. Install in the reverse order of removal.
4. After installation, inspect the parking brake lever stroke..
|
1 |
Parking brake switch connector |
|
2 |
Adjusting nut |
|
3 |
Bolt |
|
4 |
Parking brake lever |
|
5 |
Parking brake switch |
 Parking Brake Lever Inspection
Stroke Inspection
1. Pump the brake pedal a few times.
2. Pull the parking brake lever two to three times.
3. Inspect the parking brake stroke by slowly pulling at point A 50 mm {1.97
in} from ...
 Parking Brake Switch Inspection
1. Remove the upper panel..
2. Disconnect the parking brake switch connector.
3. Verify that the continuity is as indicated in the table.
If not as indicated in the table, replace the ...
Other materials:
Body Control Module (Bcm) Removal/Installation
CAUTION:
When replacing the BCM, the configuration procedure must be performed before
removing the BCM. Replacing the BCM without performing the configuration procedure
will result in system malfunction.
ATX
1. Perform the BCM configuration when replacing it..
2. Disconnect t ...
Intermediate Sensor Removal/Installation [FS5 A EL]
CAUTION:
If foreign materials are stuck to the sensor, disturbance by magnetic flux
can cause sensor output to be abnormal and thereby negatively affect control.
Make sure that foreign materials such as iron filings are not stuck to the sensor
during installation.
1. Perform t ...
Mazda Radar Cruise Control
(MRCC)
The Mazda Radar Cruise Control (MRCC) system is designed to maintain headway
control *1
according to the vehicle speed using a radar sensor (front) to detect the
distance to a vehicle
ahead, and by presetting the vehicle speed between 30 km/h (19 mph) and 145 km/h
(90
mph), the driver is fr ...
