Mazda 3 Service Manual: Rear Brake (Disc) Removal/Installation
CAUTION:
-
If the brake hose is installed to the caliper on the vehicle, the tool cannot be installed correctly resulting in brake fluid leakage due to improper installation. Therefore, remove the caliper and brake hose as a single unit when removing the caliper or brake hose, and tighten the brake hose to the caliper to the specified torque, then install the caliper and brake hose as a single unit when installing to the vehicle.
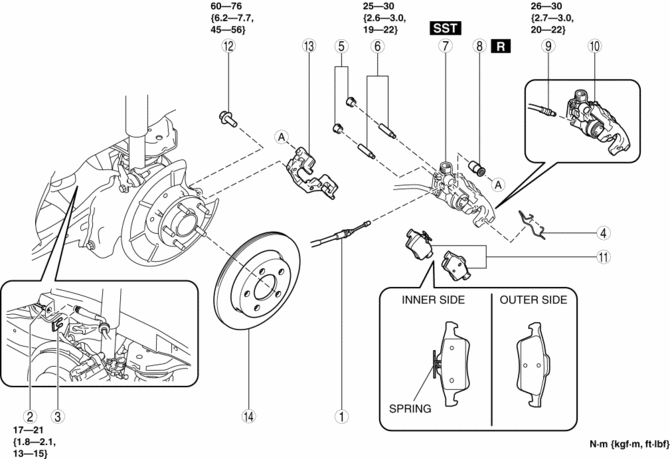
1. Remove in the order indicated in the table.
2. Install in the reverse order of removal.
3. After installation, pump the brake pedal a few times and inspect the following:
-
Parking brake lever stroke
-
Brake drag
|
1 |
Parking brake cable (See PARKING BRAKE LEVER REMOVAL/INSTALLATION.) |
|
2 |
Brake pipe (See Clip and Brake Pipe Installation Note.) |
|
3 |
Clip (See Clip and Brake Pipe Installation Note.) |
|
4 |
Retaining clip (See Retaining Clip Installation Note.) |
|
5 |
Cap |
|
6 |
Bolt |
|
7 |
Caliper, brake hose (See Caliper and Brake Hose Removal Note.) (See Caliper and Brake Hose Installation Note.) |
|
8 |
Boot |
|
9 |
Brake hose (See Brake Hose Installation Note.) |
|
10 |
Caliper |
|
11 |
Disc pad |
|
12 |
Bolt |
|
13 |
Mounting support |
|
14 |
Disc plate |
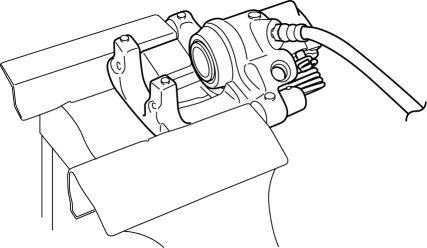
Caliper and Brake Hose Removal Note
1. Remove the caliper and brake hose from the vehicle as a single unit.
Brake Hose Installation Note
1. Secure the caliper to the vise and install the brake hose to it.
CAUTION:
-
Insert a protective plate into the vise opening so as not to damage the caliper.
2. Tighten the brake hose to the specified torque.
-
Tightening torque
-
26—30 N·m {2.7—3.0 kgf·m, 20—22 ft·lbf}
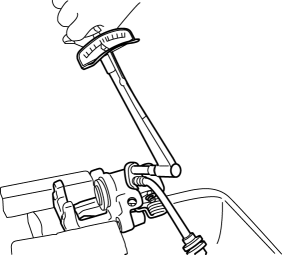
Caliper and Brake Hose Installation Note
1. Clean the exposed area of the piston.
2. Install the SST
(49 F043 002) to the SST
(49 B043 005).
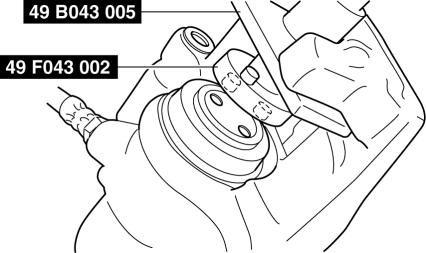
3. Align the SST
projection to the piston groove.
4. Rotate part A on the SST
in the direction of the arrow and secure the SST
to the caliper.
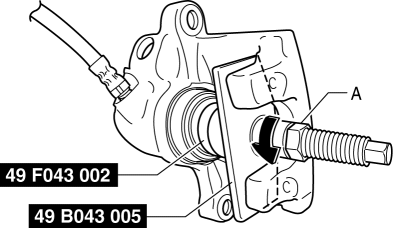
5. Rotate the SST
in the direction of the arrow and push the piston completely into the caliper.
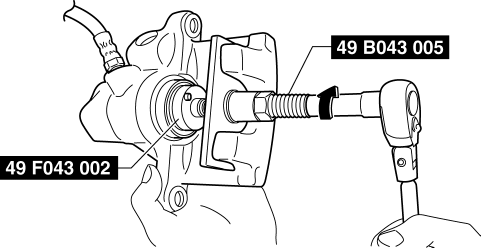
NOTE:
-
Even with the piston completely pushed in, the top of the piston projects from the dust seal by approximately 2 mm
{0.09 in}
.
6. Rotate part A on the SST
in the direction of the arrow using the tool and remove the SST
from the caliper.
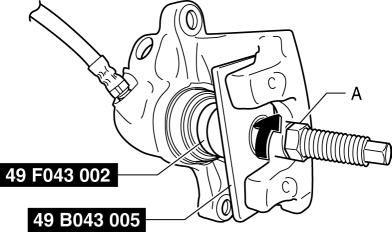
7. Install the caliper and brake hose to the vehicle as a single unit.
Retaining Clip Installation Note
1. Temporarily install the retaining clip to the caliper and mounting support as shown in the figure.
2. Secure the retaining clip so that part A does not slip off from the caliper while installing part B to the mounting support.
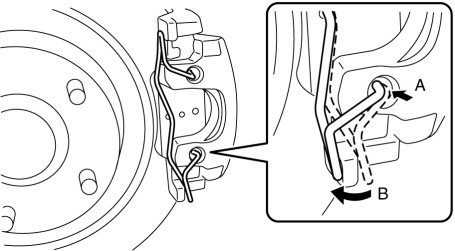
3. Verify that the retaining clip is securely installed to the caliper and the mounting support.
Clip and Brake Pipe Installation Note
1. Install the brake hose to the vehicle-side bracket and secure it using a clip.
2. Verify that the brake hose is not twisted.
3. Tighten the brake pipe to the specified torque using a commercially available flare nut wrench.
 Rear Brake (Disc) Inspection
Brake Judder Repair Hints
Description
1. Brake judder concern has the following 3 characteristics:
Steering wheel vibration
1. The steering wheel vibrates in the rotation direction. This characte ...
 Parking Brake
...
Other materials:
Keyless Control Module Inspection
1. Remove the following parts:
a. Passenger-side front scuff plate.
b. Passenger-side front side trim.
c. Grove compartment.
d. Passenger-side lower panel.
2. Measure the voltage according to the terminal voltage table.
If the voltages cannot be verified as indicated in the termina ...
Oil Seal Replacement [FS5 A EL]
1. Remove the aerodynamic under cover No. 2..
2. Remove the oil seal.
a. Drain the ATF..
b. Remove the drive shaft and/or joint shaft..
CAUTION:
The oil seal is easily damaged by the sharp edges of the drive shaft splines.
Do not let the splines contact the oil seal.
c. Remo ...
Stop Vehicle in Safe Place Immediately
If any of the following warning lights turns on, the system may have a
malfunction. Stop the
vehicle in a safe place immediately and contact an Authorized Mazda Dealer.
...
