Mazda 3 Service Manual: Rear Speaker Removal/Installation
4SD
1. Disconnect the negative battery cable..
2. Remove the following parts:
a. Rear seat cushion.
b. Rear scuff plate.
c. Tire house trim.
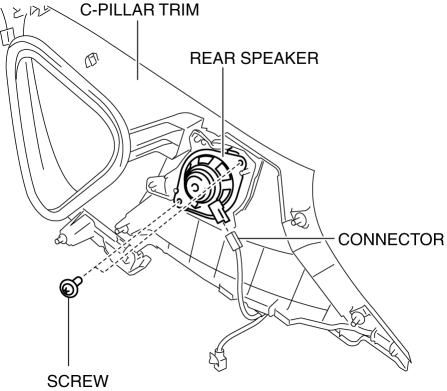
d. C-pillar trim.
e. Rear package trim.
3. Remove the screw.
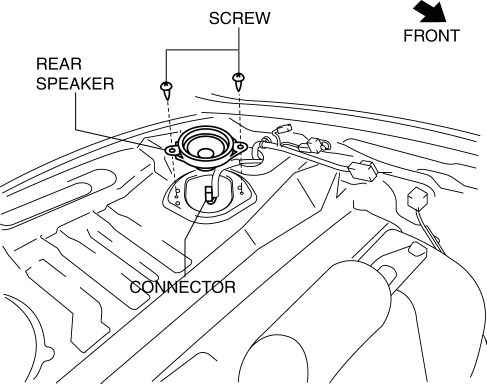
4. Disconnect the connector.
5. Remove the rear speaker.
6. Install in the reverse order of removal.
5HB
1. Disconnect the negative battery cable..
2. Remove the following parts:
a. Rear scuff plate.
b. Tire house trim.
c. Trunk side upper trim.
d. Trunk side trim.
e. C-pillar trim.
3. Remove the screw.
4. Disconnect the connector.
5. Remove the rear speaker.
6. Install in the reverse order of removal.
 Rear Speaker Inspection
4SD
1. Disconnect the negative battery cable..
2. Remove the following parts:
a. Rear seat cushion.
b. Rear scuff plate.
c. Tire house trim.
d. C-pillar trim.
e. Rear package trim.
f. R ...
 Sirius Satellite Radio Antenna Feeder Inspection
SIRIUS Satellite Radio Antenna Feeder No.1
NOTE:
SIRIUS satellite radio antenna feeder No.1 is integrated with the dashboard
wiring harness.
1. Disconnect the negative battery cable. ...
Other materials:
Bluetooth® Audio (Type A)
Applicable Bluetooth ® specification
(Recommended)
Ver. 2.0
Response profile
A2DP (Advanced Audio Distribution
Profile) Ver. 1.0/1.2
AVRCP (Audio/Video Remote Control
Profile) Ver. 1.0/1.3
A2DP is a profile which transmits only
audio to the Bluetooth ® unit. If your
Bluetooth ® ...
Brake Hose (Rear) Removal/Installation [Mzr 2.5, Mzr 2.3 Disi Turbo]
1. Remove in the order indicated in the table.
2. Install in the reverse order of removal.
3. Add brake fluid, bleed the brakes, and inspect for leakage after the installation
has been completed..
1
Brake pipe
(See Clip and Brake Pipe Installation Note.)
...
Operating the Radio
Radio ON
Press a band selector button ( )
to
turn the radio on.
Band selection
Successively pressing the band selector
button ( ) switches the bands as
follows: FM1→FM2→AM.
The selected mode will be indicated.
NOTE
If the FM broadcast signal becomes weak,
reception auto ...
