Mazda 3 Service Manual: Sirius Satellite Radio Antenna Feeder Inspection
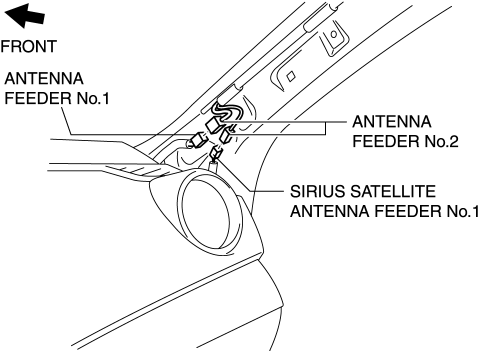
SIRIUS Satellite Radio Antenna Feeder No.1
NOTE:
-
SIRIUS satellite radio antenna feeder No.1 is integrated with the dashboard wiring harness.
1. Disconnect the negative battery cable..
2. Remove the following parts:
a. Passenger-side front scuff plate.
b. Passenger-side front side trim.
c. Dashboard under cover.
d. Grove compartment.
e. Passenger-side lower panel.
f. A-pillar trim (RH).
3. Disconnect the SIRIUS satellite radio antenna feeder connector..
4. Disconnect the antenna feeder No.2.
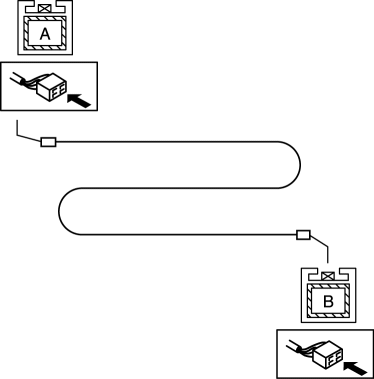
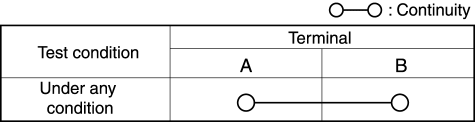
5. Verify that the continuity between SIRIUS satellite radio antenna feeder No.1 terminals is as indicated in the table.
-
If not as indicated in the table, replace dashboard wiring harness.
SIRIUS Satellite Radio Antenna Feeder No.2
NOTE:
-
SIRIUS satellite radio antenna feeder No.2 is integrated with the antenna feeder No.2.
1. Refer to ANTENNA FEEDER NO.2 INSPECTION.
SIRIUS Satellite Radio Antenna Feeder No.3
NOTE:
-
SIRIUS satellite radio antenna feeder No.3 is integrated with the antenna feeder No.3.
1. Refer to ANTENNA FEEDER NO.3 INSPECTION.
 Rear Speaker Removal/Installation
4SD
1. Disconnect the negative battery cable..
2. Remove the following parts:
a. Rear seat cushion.
b. Rear scuff plate.
c. Tire house trim.
d. C-pillar trim.
e. Rear package trim.
3. R ...
 Sirius Satellite Radio Antenna Feeder Removal/Installation
SIRIUS Satellite Radio Antenna Feeder No.1
NOTE:
SIRIUS satellite radio antenna feeder No.1 is integrated with the dashboard
wiring harness.
1. Refer to DASHBOARD DISASSEMBLY/ASSEMBL ...
Other materials:
Rear Speaker Inspection
4SD
1. Disconnect the negative battery cable..
2. Remove the following parts:
a. Rear seat cushion.
b. Rear scuff plate.
c. Tire house trim.
d. C-pillar trim.
e. Rear package trim.
f. Rear speaker.
3. Verify the resistance between the rear speaker terminals.
If not withi ...
Supplier Identification Procedure [Audio]
Identification Using the Label or Inscribed Lettering
1. Disconnect the negative battery cable..
2. Remove the center panel..
3. Remove the audio unit..
4. Verify the supplier by referring to the label attached to each unit.
Verify Using the Diagnostic Assist Function
Without display
...
Automatic Transaxle Fluid (ATF) Replacement [Fw6 A EL]
WARNING:
Do not perform the servicing while the ATF is hot. Otherwise, it could cause
severe burns or serious injury.
1. Remove aerodynamic undercover No.2..
2. Remove the dipstick securing bolt.
3. Remove the dipstick.
4. Remove the drain plug and washer, and drain the AT ...
