Mazda 3 Service Manual: Refrigerant Pressure Sensor Removal/Installation [Manual Air Conditioner]
1. Disconnect the negative battery cable..
2. Discharge the refrigerant..
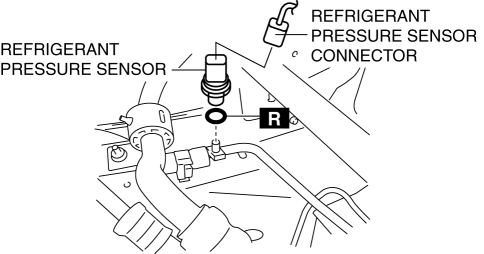
3. Disconnect the refrigerant pressure sensor connector.
CAUTION:
-
If moisture or foreign material enters the refrigeration cycle, cooling ability will be lowered and abnormal noise will occur. Always immediately plug all open fittings after removing any refrigeration cycle parts to keep moisture or foreign material out of the cycle.
4. Loosen the refrigerant pressure sensor using two spanners.
5. Remove the refrigerant pressure sensor..
-
Tightening torque
-
10—11 N·m {102—112 kgf·cm, 89—97 in·lbf}
6. Install in the reverse order of removal.
7. Perform the refrigerant system performance test..
Refrigerant Pressure Sensor Installation Note
1. Apply compressor oil to the O-rings and connect the joints.
 Refrigerant Pressure Sensor Removal/Installation [Full Auto Air Conditioner]
1. Disconnect the negative battery cable..
2. Discharge the refrigerant..
3. Disconnect the refrigerant pressure sensor connector.
CAUTION:
If moisture or foreign material enters the ref ...
 Engine Assembly
...
Other materials:
Rear Stabilizer Control Link Inspection
1. Remove the rear stabilizer control link from the vehicle..
2. Inspect for bending or damage. If there is any malfunction, replace the rear
stabilizer control link.
3. Rotate the ball joint stud 10 times and shake it side to side 10
times.
4. Measure the ball joint rotational torque usin ...
Non Return Valve Inspection [Mzr 2.0, Mzr 2.5]
WARNING:
Fuel is very flammable liquid. If fuel spills or leaks from the pressurized
fuel system, it will cause serious injury or death and facility breakage. Fuel
can also irritate skin and eyes. To prevent this, always complete the “Fuel
Line Safety Procedure”, while referring ...
Storage Compartments
WARNING
Keep storage boxes closed when
driving:
Driving with the storage boxes open is
dangerous. To reduce the possibility of
injury in an accident or a sudden stop,
keep the storage boxes closed when
driving.
Do not put articles in storage spaces
with no lid:
...
