Mazda 3 Owners Manual: Replacing Interior Light Bulbs
Overhead lights (Front)/Map lights * , Overhead lights (Front) * , Overhead lights (Rear) * , Vanity mirror lights *
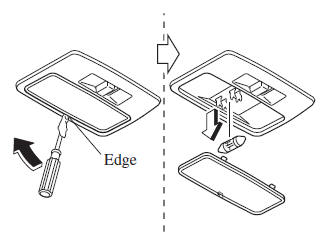
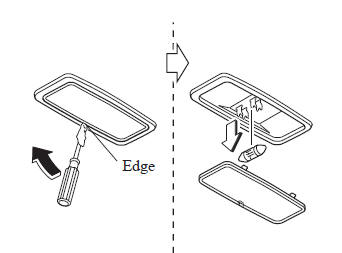
- Wrap a small flathead screwdriver with a soft cloth to prevent damage to the lens, and then remove the lens by carefully prying on the edge of the lens with the flathead screwdriver.
- Disconnect the bulb by pulling it out.
Overhead lights (Front)/Map lights
Overhead lights (Front) *
Overhead lights (Rear) *
Vanity mirror lights
- Install the new bulb in the reverse order of the removal procedure
Trunk light (4–Door)
- Press both sides of the lens cap to remove it.
- Disconnect the bulb by pulling it out.
- Install the new bulb in the reverse order of the removal procedure.
Luggage compartment light (5–Door)
- Wrap a small flathead screwdriver with a soft cloth to prevent damage to the lens and remove the lens by carefully prying on the edge of the lens with the flathead screwdriver.
- Disconnect the connector from the unit by pressing the tab on the connector with your finger and pulling the connector.
- Disconnect the bulb by pulling it out.
- Install the new bulb in the reverse order of the removal procedure.
 Replacing Exterior Light Bulbs
Headlights (With xenon fusion
headlights)
Low/High beam bulbs
You cannot replace the low/high beam
bulbs by yourself. The bulbs must be
replaced at an Authorized Mazda Dealer.
Headlights (With h ...
 Fuses
Fuses
Your vehicle's electrical system is
protected by fuses.
If any lights, accessories, or controls do
not work, inspect the appropriate circuit
protector. If a fuse has blown, the inside
element w ...
Other materials:
Manifold Absolute Pressure (Map) Sensor/Boost Air Temperature Sensor Removal/Installation
[Mzr 2.3 Disi Turbo]
NOTE:
Because the boost air temperature sensor is integrated in the MAP sensor,
replacing the boost air temperature sensor includes replacement of the MAP sensor/boost
air temperature sensor.
1. Remove the battery cover..
2. Disconnect the negative battery cable..
3. Remove t ...
Liftgate Side Trim Removal/Installation
1. Remove the liftgate upper trim..
2. Pull the point A of the strap hanger as shown in the figure.
3. Remove the strap hanger.
4. Remove the fastener.
5. Pull the liftgate side trim in the direction of arrow then remove clip A.
6. Detach tab B and C while pulling the liftgate sid ...
Input/Turbine Speed Sensor Removal/Installation [FS5 A EL]
CAUTION:
Always use a new bolt. If the removed input/turbine speed sensor installation
bolt is reused, it may cause oil leakage.
A sealant coating is applied to the input/turbine speed sensor installation
bolt to prevent oil leakage from the installation bolt hole which passes ...
