Mazda 3 Service Manual: Seat Warmer Unit Inspection
WARNING:
-
Handling a front seat (with built-in side air bag) improperly can accidentally operate (deploy) the air bag, which may seriously injure you. Read the service warnings before handling a front seat (with built-in side air bag)..
CAUTION:
-
After removing a front seat, do not operate the slider lever. If the slider lever is operated, the left and right slide positions will deviate, and the slide adjuster may be damaged after the front seat is installed.
-
Verify that there are no malfunctions in the sliding mechanism after installing a front seat.
-
When performing the procedure with a front seat removed from the vehicle, perform the procedure on a clean rag so as not to damage or soil the seat.
-
When the passenger's seat is removed, perform the seat weight sensor inspection using the M-MDS after installing the passenger's seat..
-
When the passenger's seat is replaced with a new one, perform the seat weight sensor calibration using the M-MDS..
Seat Cushion
1. Remove the battery cover..
2. Disconnect the negative battery cable and wait 1 min or more
..
3. Remove the front seat..
4. Remove the front seat side cover.
5. Remove the front seat cushion trim..
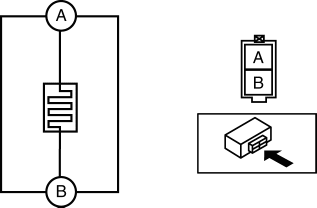
6. Verify that the continuity between terminals A and B is as indicated in the table.
-
If not as indicated in the table, replace the seat warmer unit..

Seat Back
1. Remove the battery cover..
2. Disconnect the negative battery cable and wait 1 min or more
..
3. Remove the front seat..
4. Remove the front seat back trim..
5. Verify that the continuity between terminals A and B is as indicated in the table.
-
If not as indicated in the table, replace the seat warmer unit..
 Seat Warmer Switch Removal/Installation
1. Remove the battery cover..
2. Disconnect the negative battery cable..
3. Remove the shift panel..
4. Squeeze the tabs of seat warmer switch and pull it outward to remove it.
5. Remove ...
 Seat Warmer Unit Removal/Installation
Removal
WARNING:
Handling a front seat (with built-in side air bag) improperly can accidentally
operate (deploy) the air bag, which may seriously injure you. Read the service
warnings b ...
Other materials:
Checking Tire Pressure
When you check the air pressure, make sure the tires are cold —meaning
they are not hot
from driving even a mile.
Remove the cap from the valve on one tire.
Firmly press a tire gauge onto the valve.
Add air to achieve recommended air pressure.
If you overfill the tire, release air ...
Operating Tips for AAC
AAC stands for Advanced Audio Coding,
which is standardized voice compression
established by the ISO *1 working group
(MPEG). Audio data can be created and
stored at a higher compression ratio than
MP3.
This unit plays files with the extensions
(.aac/.m4a/.wav *2 ) as the AAC files.
*1 Int ...
PDA (Proactive driving assist)
In the Subaru Solterra, the Proactive Driving Assist (PDA) system
continuously monitors the surroundings and, when a detectable object is identified,
it can automatically apply gentle braking and subtle steering input to help maintain
a safe distance and reduce the likelihood of getting too cl ...
