Mazda 3 Service Manual: Sunroof Motor Inspection
1. Disconnect the negative battery cable..
2. Remove the rain sensor cover. (Vehicles with auto light/wiper system).
3. Disconnect the rain sensor connector. (Vehicles with auto light/wiper system)
4. Partially peel back the seaming welts.
5. Remove the following parts:
a. Sunroof seaming welt
b. A-pillar trim.
c. Front scuff plate.
d. Rear scuff plate.
e. B-pillar lower trim.
f. Upper anchor of the front seat belt.
g. B-pillar upper trim.
h. Rear seat cushion.
i. Tire house trim.
j. Trunk side upper trim (5HB).
k. C-pillar trim.
l. Map light.
m. Sunvisor.
n. Assist handle.
o. Headliner.
6. Measure the voltage at each terminal.
-
If not as specified, inspect the parts listed under “Inspection item” and the related wiring harnesses.
-
If the parts and wiring harnesses are normal but the system still does not work properly, replace the sunroof motor.
Terminal Voltage Table (Reference)
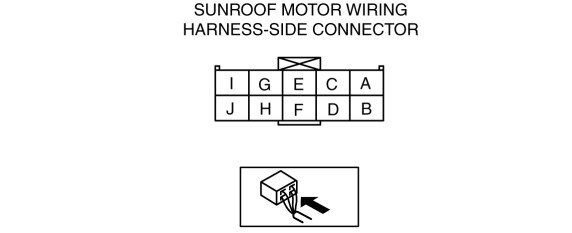
|
Terminal |
Signal |
Connected to |
Test condition |
Voltage (V) |
Inspection item |
|
A |
Slide open |
Sunroof switch |
Sunroof is fully opening. |
B+ |
Sunroof switch |
|
Other |
1.0 or less |
||||
|
B |
Slide close/tilt down |
Sunroof switch |
Sunroof is closing/tilting down. |
B+ |
Sunroof switch |
|
Other |
1.0 or less |
||||
|
C |
Tilt up |
Sunroof switch |
Sunroof is tilting up. |
B+ |
Sunroof switch |
|
Other |
1.0 or less |
||||
|
D |
— |
— |
— |
— |
— |
|
E |
IG2 |
HEATER 10 A fuse |
Switch the ignition ON. |
B+ |
HEATER 10 A fuse |
|
Other |
1.0 or less |
||||
|
F |
— |
— |
— |
— |
— |
|
G |
GND |
GND |
Under any condition |
1.0 or less |
GND |
|
H |
— |
— |
— |
— |
— |
|
I |
— |
— |
— |
— |
— |
|
J |
Power supply |
SUNROOF 15 A fuse |
Under any condition |
B+ |
SUNROOF 15 A fuse |
 Roof Carrier Bracket Removal/Installation
4SD
1. Disconnect the negative battery cable..
2. Remove the following parts:
a. Sunroof seaming welt (vehicles with sunroof)
b. Front scuff plate.
c. Rear scuff plate.
d. A-pillar trim.
...
 Sunroof Motor Removal/Installation
1. Disconnect the negative battery cable..
2. Remove the rain sensor cover. (Vehicles with auto light/wiper system).
3. Disconnect the rain sensor connector. (Vehicles with auto light/wiper system ...
Other materials:
Drive Belt Inspection [Skyactiv G 2.0]
Generator Drive Belt
NOTE:
The generator drive belt deflection/tension inspection is not necessary with
the adoption of the drive belt auto tensioner.
1. Verify that the indicator part of the cast hexagon on the drive belt auto
tensioner is within the normal range.
If ...
Overloading
WARNING
Be careful not to overload your vehicle:
The gross axle weight rating (GAWR)
and the gross vehicle weight rating
(GVWR) of the vehicle are on the
Motor Vehicle Safety Standard Label
on the driver's door frame. Exceeding
these ratings can cause an accident
or ve ...
Riding with children
When traveling with children in the Subaru Solterra, always follow
these important safety recommendations to ensure their protection and comfort during
every journey.
Always use a child restraint system that is appropriate for the child’s
age, size, and weight until they are able to correct ...
