
Mazda 3 Owners Manual: System
The system operates only when the driver is in the vehicle or within operational range while the key is being carried.
NOTE When the battery power is low, or in places where there are high-intensity radio waves or noise, the operational range may become narrower or the system may not operate. For determining battery replacement, Refer to Keyless Entry System on .
Locking, Unlocking the Doors and the Liftgate
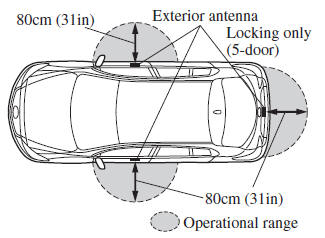
NOTE The system may not operate if you are too close to the windows or door handles, or liftgate.
Opening the Liftgate/Trunk Lid
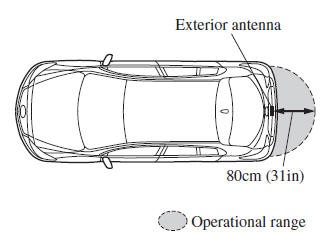
 Advanced Keyless Entry
WARNING
Radio waves from the key may aff ect
medical devices such as pacemakers:
Before using the key near people who
use medical devices, ask the medical
device manufacturer or ...
 Operational Range
WARNING
Always take all children and pets with
you or leave a responsible person with
them:
Leaving a child or a pet unattended in
a parked vehicle is dangerous. In hot
weathe ...
Other materials:
No.6 Bsm Indicator Light Flashes While Not Under Bsm Indicator Light Flashing
Conditions (No Combination Switch Operation (Turn Signal Switch)) [Blind Spot Monitoring
(Bsm)]
6
BSM indicator light flashes while not under BSM indicator light-flashing
conditions (no combination switch operation (turn signal switch)
Description
The BSM indicator light flashes despite not satisfying the BSM indicator
l ...
Rear Wheel Hub Bolt Replacement
1. Remove the brake calliper component and disc plate..
2. Remove the wheel hub bolt using the SST as shown in the figure.
3. Place a new wheel hub bolt in the wheel hub.
4. Install the wheel hub by placing a proper sized washer on the hub, and tightening
the nut as shown in the figure. ...
Checking tires
Regular inspection of the tires on your Subaru Solterra is essential for maintaining
safety, efficiency, and optimal driving performance. Begin by checking whether the
treadwear indicators are visible, as these serve as a clear signal of tire wear.
Additionally, carefully examine each tire for ...
