Mazda 3 Service Manual: Trunk Lid Latch And Release Actuator Removal/Installation
1. Disconnect the negative battery cable..
2. Remove the trunk lid trim..
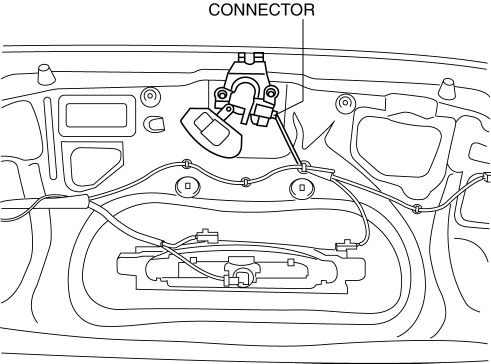
3. Disconnect the connector.
4. Remove the bolts.
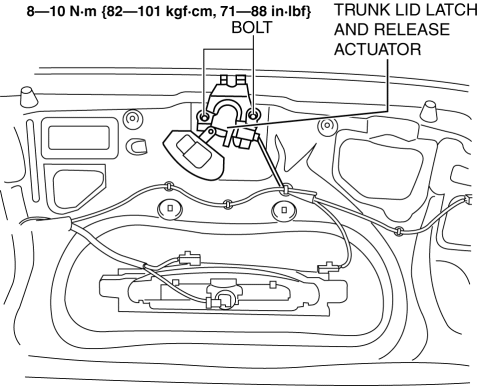
5. Remove the trunk lid latch and release actuator.
6. Install in the reverse order of removal.
 Trunk Lid Latch And Release Actuator Inspection
1. The following actuator and switch are integrated with the release actuator.
Inspect the trunk lid latch and release actuator according to each inspection procedure
for the following items.
...
 Trunk Lid Latch Switch Inspection
1. Disconnect the negative battery cable..
2. Remove the trunk lid trim..
3. Remove the trunk lid latch and lock actuator..
4. Press the latch in using a flathead screwdriver to inspect the latc ...
Other materials:
Fuel Injector Inspection [Mzr 2.0, Mzr 2.5]
Resistance Inspection
1. Remove the battery cover..
2. Disconnect the negative battery cable..
3. Disconnect the fuel injector connector.
4. Inspect the resistance between fuel injector terminals A and B.
Fuel injector resistance
11.4—12.6 ohms [20 °C {68 °F}]
If ...
HVAC SST
49 B061 014
Spring Lock Coupling Disconnect Tool
49 G061 001
Spring Lock Coupling Disconnect Tool
49 B061 015A
Holder
49 0839 425C
Bearing puller set
49 SE01 160 ...
Sirius Satellite Radio Antenna Feeder Inspection
SIRIUS Satellite Radio Antenna Feeder No.1
NOTE:
SIRIUS satellite radio antenna feeder No.1 is integrated with the dashboard
wiring harness.
1. Disconnect the negative battery cable..
2. Remove the following parts:
a. Passenger-side front scuff plate.
b. Passenger-side front ...
