Mazda 3 Service Manual: Automatic Transaxle Fluid (ATF) Inspection [FS5 A EL]
Automatic Transaxle Fluid (ATF) Condition Inspection
1. One way of determining whether the transaxle should be disassembled is by noting:
-
If the ATF is muddy or varnished.
-
If the ATF smells strange or unusual.
|
ATF Condition |
Possible cause |
||
|
Clear red |
Normal |
— |
|
|
Light red: pink |
Contaminated with water |
|
|
|
Reddish brown |
Has burnt smell and metal specks are found |
Deteriorated ATF |
|
|
Has no burnt smell |
Normal |
|
|
Automatic Transaxle Fluid (ATF) Level Inspection
CAUTION:
-
If there is no ATF adhering to the dipstick after warming-up the engine, there is insufficient ATF. Therefore do not drive the vehicle as it could damage the transaxle.
-
If a final inspection of the ATF level is performed without driving the vehicle, or the ATF amount is inspected while the ATF temperature is not at about 60—70 °C {140—158 °F}, the transaxle could be damaged because the ATF level inspection would be incorrect.
-
If too much ATF is added, the ATF temperature will increase and ATF could leak from the breather hose.
NOTE:
-
The dipstick of the FS5A-EL type measures the ATF level on the differential side and, under the condition that the ATF temperature on the differential side does not rise even after warming up the engine, ATF adhering to the end of the dipstick is normal.
1. Inspect the ATF level before driving the vehicle.
a. Park the vehicle on level ground, and then engage the parking brake and use wheel chocks at the front and rear of the wheels.
b. Verify visually that there is no ATF leakage from the oil hose or housing.
c. Start the engine and warm it up in the P position.
CAUTION:
-
If the oil level decreases dramatically while warming-up the engine, do not shift the selector lever as it could damage the transaxle.
d. Remove the dipstick and wipe it clean while the engine is idling.
e. Install the dipstick and remove it again.
f. Verify that the ATF level is in the range as shown in the figure.
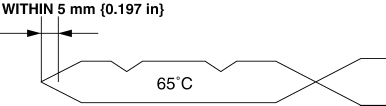
-
If the ATF level is out of the range, adjust the ATF to the specification.
-
ATF type
-
Mazda Genuine ATF M-V
2. Inspect the ATF level after driving the vehicle.
a. Shift the selector lever and pause momentarily in each position (from the P position to the D position) while depressing the brake pedal.
b. Drive on city roads at a minimum of 5 km {3 mile}.
c. Connect the M-MDS to the DLC-2.
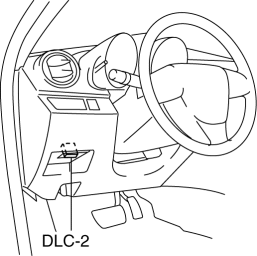
d. Verify that the ATF temperature is 60—70 °C {140—158 °F} using the M-MDS.
e. Remove the dipstick and wipe it clean while the engine is idling.
f. Verify that the ATF level is in the range as shown in the figure.
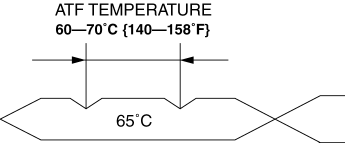
-
If the ATF level is out of the range, adjust the ATF to the specification.
-
ATF type
-
Mazda Genuine ATF M-V
 Automatic Transaxle Fluid (ATF) Adjustment [Fw6 A EL]
CAUTION:
Only adjust the ATF level when the ATF temperature is 45—55 °C {113—131 °F}.
If the ATF level is incorrect, it could damage the transaxle.
Do not add ATF over the spe ...
 Automatic Transaxle Fluid (ATF) Inspection [Fw6 A EL]
CAUTION:
If the ATF level is not within the specification or ATF is not adhering to
the dipstick after warming up the engine, do not drive the vehicle. Otherwise,
the transaxle could be ...
Other materials:
Air Intake Actuator Inspection [Manual Air Conditioner]
1. Connect battery positive voltage to air intake actuator terminal B (or C),
connect terminal C (or B) to ground, and then verify that the air intake actuator
operates as shown in the table.
If the operation condition is not normal, replace the air intake actuator.
...
Rear Seat Back Frame Removal/Installation
1. Remove the rear seat cushion..
2. Remove the rear buckle installation bolt..
3. Remove the rear seat back..
4. Remove the headrest.
5. Open the fasteners.
6. Detach the hooks.
7. Remove the child-restraint seat anchor covers in the order of (1), (2) as
shown in the figure. (5H ...
Transaxle Oil Inspection [G66 M R]
1. Park the vehicle on level ground.
2. Remove the aerodynamic under cover No.2..
3. Remove the oil level plug and washer.
4. Verify that the oil is near the brim of the plug port.
If the oil level is lower than the low level, add the specified amount and
type of oil through the ...
