Mazda 3 Service Manual: Trunk Side Upper Trim Removal/Installation
1. Remove the rear seat cushion..
2. Remove the rear scuff plate..
3. Remove the tire house trim..
4. Open the cap.
5. Remove the screw.
6. Remove the fasteners.
7. Pull the trunk side upper trim in the direction of arrow, then detach the hooks and clips.
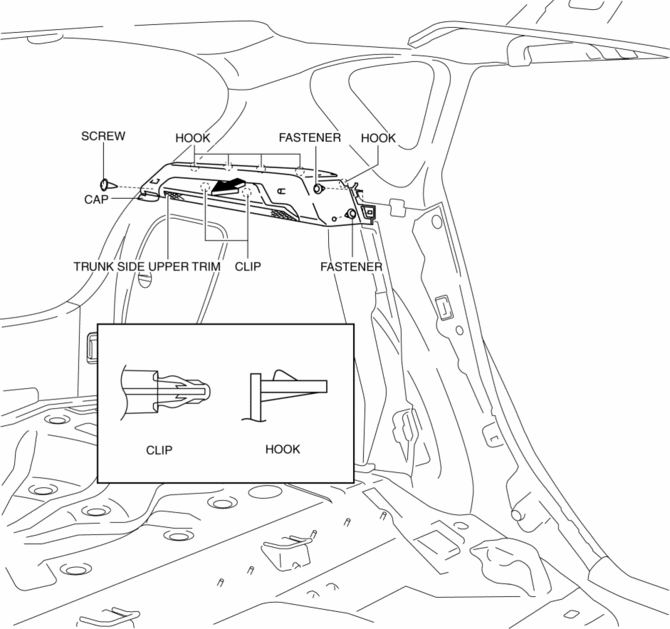
8. Install in the reverse order of removal.
 Side Wall Removal/Installation
1. Pull out the side wall in the direction shown in the direction of the arrow
shown in the figure, then remove the clips.
2. Remove the side wall in the direction of the arrow shown in the fi ...
 Assist Handle Removal/Installation
Assist Handle Removal
1. Insert a flathead screwdriver into the service hole and remove the assist
handle covers.
2. Remove the assist handle in the direction of the arrow (1) and (2), while ...
Other materials:
Front Seat Belt Removal/Installation [Two Step Deployment Control System]
WARNING:
Handling the front seat belt (pre-tensioner seat belt) improperly can accidentally
deploy the pre-tensioner seat belt, which may seriously injure you. Read the
air bag system service warnings and cautions before handling the front seat
belt..
WARNING:
The side ...
Engine Oil Replacement [Mzr 2.0, Mzr 2.5]
WARNING:
Hot engines and engine oil can cause severe burns. Turn off the engine and
wait until it and the engine oil have cooled.
A vehicle that is lifted but not securely supported on safety stands is dangerous.
It can slip or fall, causing death or serious injury. Never work ...
Intake Air System Removal/Installation [Mzr 2.0, Mzr 2.5]
WARNING:
A hot engine and intake air system can cause severe burns. Turn off the engine
and wait until they are cool before removing the intake air system.
Fuel is very flammable liquid. If fuel spills or leaks from the pressurized
fuel system, it will cause serious injury or d ...
