Mazda 3 Service Manual: Variable Tumble Shutter Valve Actuator Inspection [Mzr 2.0, Mzr 2.5]
Operation Inspection
1. Remove the air hose..
2. Disconnect the vacuum hose from the variable tumble shutter valve actuator.
3. Connect a vacuum pump to the variable tumble shutter valve actuator.
NOTE:
-
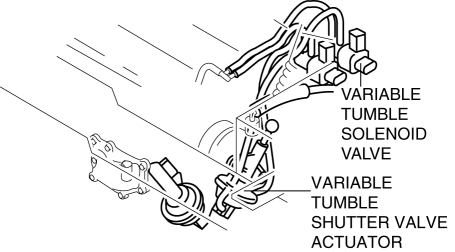
Covered with a hood, the rod of the variable tumble shutter valve actuator cannot be seen from above. Use a mirror from under it to check the operation of the variable tumble shutter valve.
4. Check if the rod operates correctly as stated in the table when a gradual negative pressure is applied to the variable tumble shutter valve actuator.
|
Vacuum kPa {mmHg, inHg} |
Rod movement |
|
Below –2.7 {–20, –0.8} |
No operate |
|
Above –33.4 {–251, –9.86} |
Fully pulled |
-
When it is not possible to confirm it, replace the intake manifold..
-
When the variable tumble shutter valve actuator cannot be activated even though the operation of the rod can be confirmed, check for any incorrect connections or breakage of the vacuum hose.
 Variable Swirl Solenoid Valve Inspection [Mzr 2.3 Disi Turbo]
Airflow Inspection
1. Remove the battery cover..
2. Disconnect the negative battery cable..
3. Remove the variable swirl solenoid valve..
4. Inspect the airflow between the ports under the foll ...
 Variable Tumble Solenoid Valve Inspection [Mzr 2.0, Mzr 2.5]
Airflow Inspection
1. Remove the battery cover..
2. Disconnect the negative battery cable..
3. Remove the variable tumble solenoid valve..
4. Inspect airflow between the ports under the followi ...
Other materials:
Fuel Filler Lid Opener And Lever Removal/Installation
Fuel-filler Lid Opener
4SD
1. Open the fuel-filler lid.
2. Remove the following parts:
a. Trunk end trim.
b. Trunk side trim (RH).
3. Remove the nut.
4. Remove the lift spring.
5. Pull out the fuel-filler lid opener in the direction of the arrow (1).
6. Disconnect the fue ...
Wheel Alignment Pre Inspection
1. Park the vehicle on a level ground, in an unloaded condition*, and with the
wheels straight forward.
*: Unloaded condition.....Fuel tank is full. Engine coolant and engine oil are
at specified level. Spare tire, jack and tools are in designated position.
2. Inspect the tire pressure.
...
Operational Range
The system operates only when the driver
is in the vehicle or within operational
range while the key is being carried.
Starting the Engine
NOTE
Starting the engine may be possible
even if the key is outside of the vehicle
and extremely close to a door and
window, however, always start ...
