Mazda 3 Owners Manual: Variance Between Actual Road Conditions and Displayed Image
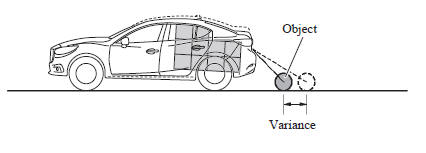
Some variance occurs between the actual road and the displayed road. Such variance in distance perspective could lead to an accident. Note the following conditions that may cause a variance in distance perspective.
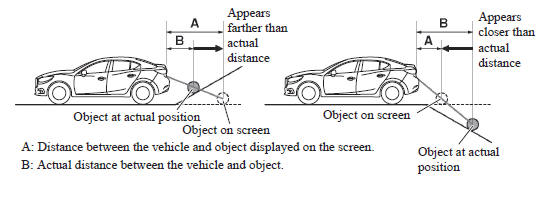
When the vehicle is tilted due to the weight of passengers and load
When the vehicle rear is lowered, the object displayed on the screen appears farther than the actual distance.
When there is a steep grade behind the vehicle
When there is a steep upgrade (downgrade) behind the vehicle, the object displayed on the screen appears farther (downgrade: closer) than the actual distance
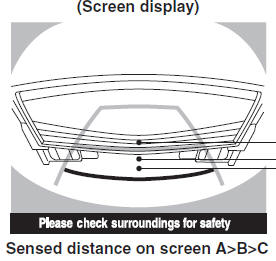
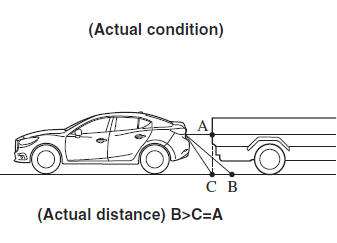
Three-dimensional object on vehicle rear
Because the distance guide lines are displayed based on a flat surface, the distance to the three-dimensional object displayed on the screen is different from the actual distance.
 Rear View Monitor Operation
The operation of the rear view monitor when reversing the vehicle varies
depending on
the traffic, road, and vehicle conditions. The amount of steering and the
timing also varies
depending on co ...
 Picture Quality Adjustment
WARNING
Always adjust the picture quality of the rear view monitor while the
vehicle is stopped:
Do not adjust the picture quality of the rear view monitor while driving
the vehic ...
Other materials:
Decoration Panel Removal/Installation
1. Remove the following parts:
a. Passenger-side front scuff plate.
b. Passenger-side front side trim.
c. Glove compartment.
d. Passenger-side lower panel.
2. Remove the screw.
3. Pull the decoration panel in the direction of the arrow (1), (2) shown in
the figure, while remove the hoo ...
Front Crossmember Removal/Installation
CAUTION:
Performing the following procedures without first removing the ABS wheel-speed
sensor may possibly cause an open circuit in the wiring harness if it is pulled
by mistake. Before performing the following procedures, disconnect the ABS wheel-speed
sensor wiring harness connec ...
Tire Pressure Monitoring System
The Tire Pressure Monitoring System (TPMS) monitors the air pressure of all
four tires. If
the air pressure of one or more tires is too low, the system warns the driver by
indicating the
tire pressure monitoring system warning light in the instrument cluster and
operating a beep
sound. The ...
