Mazda 3 Service Manual: Afs (Adaptive Front Lighting System) Off Switch Inspection
1. Disconnect the negative battery cable..
2. Remove the AFS OFF switch..
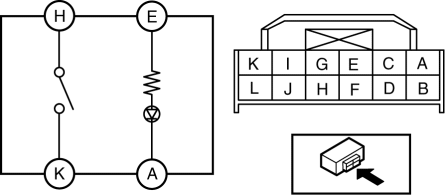
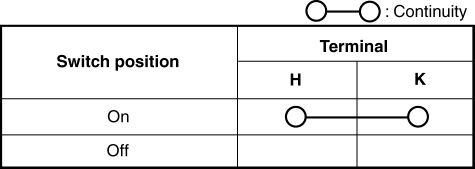
3. Verify that the continuity between the AFS OFF switch terminals is as indicated in the table.

-
If the continuity is not as indicated in the table, replace the AFS OFF switch.

4. Apply battery positive voltage to AFS OFF switch terminal E, and connect terminal A to ground.
5. Verify that the LED illuminates.
-
If there is any malfunction, replace the AFS OFF switch.
 Afs (Adaptive Front Lighting System) Control Module Removal/Installation
NOTE:
Perform the auto leveling system initialization after newly replacing the
AFS control module to assure that the auto leveling system operates correctly.
1. Disconnect the negati ...
 Afs (Adaptive Front Lighting System) Off Switch Removal/Installation
1. Disconnect the negative battery cable..
2. Remove the switch panel in the direction of the arrow shown in the figure.
3. Disconnect the connector.
4. Remove the AFS OFF switch in the dir ...
Other materials:
Plastic Part Maintenance
When cleaning the plastic lenses of the
lights, do not use gasoline, kerosene,
rectified spirit, paint, thinner, highly
acidic detergents, or strongly alkaline
detergents. Otherwise, these chemical
agents can discolor or damage the
surfaces resulting in a significant loss
in functio ...
Splash Shield Removal/Installation
Front Splash Shield
1. Remove the bolts and fastener then remove the front splash shield.
2. Install in the reverse order of removal.
Rear Splash Shield
1. Remove the fastener, screws and capnut .
2. Pull the rear splash shield in the direction of the arrow shown in the figure,
the ...
Units
Electric current
A (ampere)
Electric power
W (watt)
Electric resistance
ohm
Electric voltage
V (volt)
Length
mm (millimeter)
in (inch)
...
