Mazda 3 Service Manual: Instrument Cluster Inspection
Speedometer
Using a speedometer tester
CAUTION:
-
When only the front or the rear wheels are driven using a speedometer tester, the ABS or DSC may determine that the vehicle speed signal is in error and the engine cannot be stopped by the normal operation. If the engine cannot be stopped, perform an emergency engine stop operation..
1. Adjust the tire pressure to the specification.
2. Using a speedometer tester, verify that the tester reading is as indicated in the table below.
3. Verify that the speedometer reading is within the range indicated in the table.
-
If the speedometer does not move or the indication is not within the allowable range, inspect the PCM, ABS HU/CM (with ABS) or DSC HU/CM (with DSC), and related wiring harnesses.
-
If the PCM, ABS HU/CM (with ABS) or DSC HU/CM (with DSC), and related wiring harnesses are normal, replace the instrument cluster.
|
Speedometer tester indication (km/h) |
Allowable range (km/h) |
Speedometer tester indication (mph) |
Allowable range (mph) |
|
20 |
17—23 |
10 |
9—11 |
|
40 |
36—44 |
20 |
18—22 |
|
60 |
54—66 |
30 |
27—33 |
|
80 |
72—88 |
40 |
36—44 |
|
100 |
90—110 |
50 |
45—55 |
|
120 |
108—132 |
60 |
54—66 |
|
140 |
126—154 |
70 |
63—77 |
Using the M-MDS
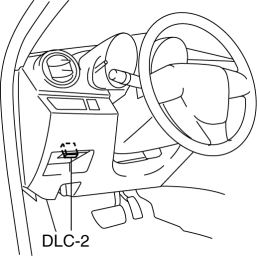
1. Connect the M-MDS (IDS) to the DLC-2.
2. After the vehicle is identified, select the following items from the initialization screen of the IDS.
-
Select “DataLogger”.
-
Select “Modules”.
-
Select “IC”.
3. Verify that it is displayed according to the table using “SPDMTR”.
-
If the speedometer does not move or the indication is not within the allowable range, inspect the related wiring harnesses.
-
If the related wiring harnesses are normal, replace the instrument cluster.
|
M-MDS display |
Instrument cluster display |
|
60 km/h |
Speedometer gauge needle moves to approx. 60 km/h |
|
120 km/h |
Speedometer gauge needle moves to approx. 120 km/h |
|
Off |
Speedometer gauge needle moves to 0 km/h |
Tachometer
CAUTION:
-
If the engine speed exceeds the allowable range, the engine could be damaged. Therefore, when inspecting the tachometer, do not allow the engine speed to exceed the allowable range indication on the tachometer.
1. Connect the M-MDS (IDS) to the DLC-2.
2. After the vehicle is identified, select the following items from the initialization screen of the IDS.
-
Select “DataLogger”.
-
Select “Modules”.
-
Select “IC”.
3. Verify that it is displayed according to the table using “TACHOMTR”.
-
If the tachometer does not move or the indication is not within the allowable range, inspect the related wiring harnesses.
-
If the related wiring harnesses are normal, replace the instrument cluster.
|
M-MDS display |
Instrument cluster display |
|
3000 RPM |
Tachometer gauge needle moves to approx. 3,000 rpm |
|
6000 RPM |
Tachometer gauge needle moves to approx. 6,000 rpm |
|
Off |
Tachometer gauge needle moves to 0 rpm |
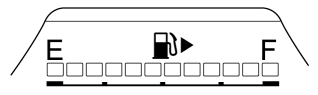
Fuel gauge
1. Connect the M-MDS (IDS) to the DLC-2.
2. After the vehicle is identified, select the following items from the initialization screen of the IDS.
-
Select “DataLogger”.
-
Select “Modules”.
-
Select “IC”.
3. Verify that it is displayed according to the table using “LCD_SEG”.
-
If any of the segments are not displayed, replace the instrument cluster.
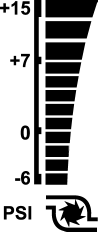
Boost gauge
1. Connect the M-MDS (IDS) to the DLC-2.
2. After the vehicle is identified, select the following items from the initialization screen of the IDS.
-
Select “DataLogger”.
-
Select “Modules”.
-
Select “IC”.
3. Verify that it is displayed according to the table using “LCD_SEG”.
-
If any of the segments are not displayed, replace the instrument cluster.
 Instrument Cluster Disassembly/Assembly
CAUTION:
Do not drop the instrument cluster or damage the printed board. This will
lead to a system malfunction.
1. Perform the instrument cluster configuration when replacing it..
...
 Instrument Cluster Removal/Installation
CAUTION:
When replacing the instrument cluster, the configuration procedure must be
performed before removing the instrument cluster. Replacing the instrument cluster
without performing ...
Other materials:
Front Wheel Hub Bolt Replacement
1. Remove the brake calliper component and disc plate..
2. Remove the wheel hub bolt using the SST as shown in the figure.
NOTE:
When removing the wheel hub bolts, perform the work between range A shown
in the figure to assure a space for the bolt removal.
3. Place a new whe ...
Transaxle Oil Replacement [G66 M R]
1. Park the vehicle on level ground.
2. Remove the aerodynamic under cover No.2..
3. Remove the drain plug and washer.
4. Drain the oil into a suitable container.
5. Install a new washer and the drain plug.
Tightening torque
39—59 N·m {4.0—6.0 kgf·m, 29—43 ft·lbf}
...
Air Bleeding
CAUTION:
If the strainer is removed, impurities may penetrate the power steering system
and damage it. To prevent this, always bleed air with the strainer installed.
Do not maintain the steering wheel fully turned for 5 s or more. The oil
temperature could rise and damage ...
