Mazda 3 Service Manual: Vacuum Line Inspection
MZR 2.0, MZR 2.5, MZR 2.3 DISI Turbo
1. Remove the vacuum hose..
2. Verify that air can be blown from the power brake unit side of the vacuum hose towards the intake manifold side, and that air cannot be blown in the opposite direction.
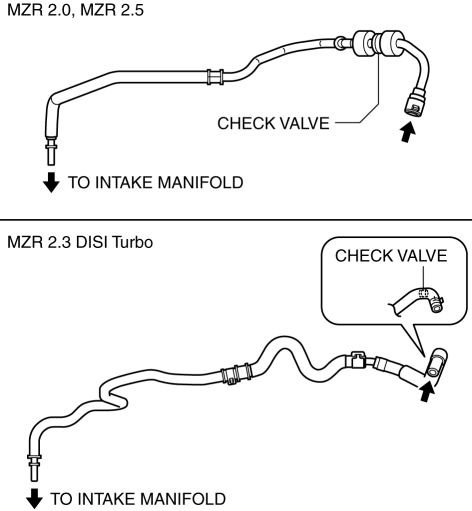
-
If there is any malfunction of the inner check valve, replace it together with the vacuum hose as a single unit.
SKYACTIV-G 2.0
1. Remove the vacuum hose..
2. Verify that air can be blown from the power brake unit side of the vacuum hose towards the vacuum pump side, and that air cannot be blown in the opposite direction.
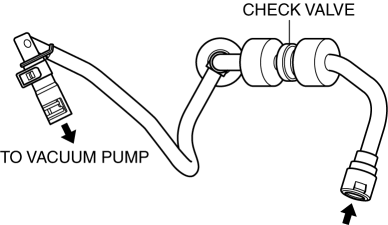
-
If there is any malfunction of the inner check valve, replace it together with the vacuum hose as a single unit.
 Vacuum Hose Removal/Installation [Skyactiv G 2.0]
1. Remove the plug hole plate..
2. Remove the battery and battery tray..
3. Remove the vacuum hose from the vacuum hose clip.
4. Pinch open the clamp using pliers and disconnect the vacuum h ...
 Vacuum Pump Inspection [Skyactiv G 2.0]
1. Pinch open the clamp using pliers and disconnect the vacuum hose from the
vacuum pump.
2. Install the vacuum gauge as shown in the figure, then check the vacuum.
3. Warn up the engin ...
Other materials:
Compression Inspection [Mzr 2.3 Disi Turbo]
WARNING:
Hot engines and oil can cause severe burns. Be careful not to burn yourself
during removal/installation of each component.
Fuel vapor is hazardous. It can very easily ignite, causing serious injury
and damage. Always keep sparks and flames away from fuel.
Fuel ...
Camshaft Position (CMP) Sensor Inspection [Mzr 2.0, Mzr 2.5]
Visual Inspection
CAUTION:
When replacing the CMP sensor, make sure there is no foreign material on
it such as metal shavings. If it is installed with foreign material, the sensor
output signal will malfunction resulting from fluctuation in magnetic flux and
cause a deterioration i ...
Non Return Valve Inspection [Skyactiv G 2.0]
WARNING:
Fuel is very flammable liquid. If fuel spills or leaks from the pressurized
fuel system, it will cause serious injury or death and facility breakage. Fuel
can also irritate skin and eyes. To prevent this, always complete the “Fuel
Line Safety Procedure”, while referring ...
