Mazda 3 Service Manual: Electric Variable Valve Timing Motor/Driver Inspection [Skyactiv G 2.0]
WARNING:
-
A hot engine can cause severe burns. Turn off the engine and wait until it is cool before servicing.
CAUTION:
-
Do not disassemble the electric variable valve timing motor/driver because it is a precision unit.
1. Remove the battery cover..
2. Disconnect the negative battery cable..
3. Remove the plug hole plate..
4. Remove the coolant reserve tank with the hose still connected and set it out of the way..
5. Remove the electric variable valve timing motor/driver..
6. Rotate the electric variable valve timing motor joint to the left and right by hand and verify that it rotates smoothly in 15°
increments.
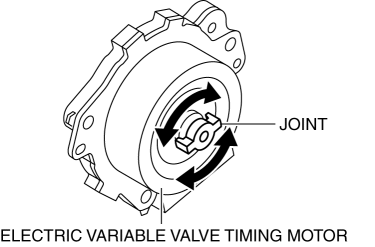
-
If it does not rotate smoothly, replace the electric variable valve timing motor/driver.(See ELECTRIC VARIABLE VALVE TIMING MOTOR/DRIVER REMOVAL/INSTALLATION [SKYACTIV-G 2.0].)
NOTE:
-
The electric variable valve timing motor joint moves in 15°
increments, and if the joint is moved 24
times, it rotates one full rotation.
7. Install in the reverse order of removal.
 Electric Variable Valve Timing Actuator, Hydraulic Variable Valve Timing Actuator
Removal/Installation [Skyactiv G 2.0]
Electric Variable Valve Timing Actuator, Hydraulic Variable Valve Timing Actuator
Removal/Installation [Skyactiv G 2.0]
WARNING:
A hot engine can cause severe burns. Turn off the engine and wait until it
is cool before servicing.
CAUTION:
Do not disassemble the electric variable valve timing ac ...
 Electric Variable Valve Timing Motor/Driver Removal/Installation [Skyactiv G
2.0]
Electric Variable Valve Timing Motor/Driver Removal/Installation [Skyactiv G
2.0]
WARNING:
A hot engine can cause severe burns. Turn off the engine and wait until it
is cool before servicing.
CAUTION:
Applying excessive force (force of 100 N {10.2 kgf, 22.5 ...
Other materials:
Brake/Taillight Bulb Removal/Installation
4SD
1. Disconnect the negative battery cable..
2. Remove the following parts:
a. Trunk mat.
b. Trunk board.
c. Trunk end trim.
3. Partially peel back the trunk side trim..
4. Remove in the order indicated in the table.
1
Connector
2
...
Component Parts
Audio unit
Microphone (hands-free)
The microphone is used for speaking voice commands or when making a
Hands-free call.
Talk button, Pick-Up button and Hang-Up button (hands-free)
The basic functions of Bluetooth ® Hands-Free can be used for such things as
making calls or
hanging up ...
Vehicle Speed Sensor (VSS) Inspection [FS5 A EL]
On-Vehicle Inspection
1. Inspect the power supply circuit for the VSS.
a. Remove the insulator from the transaxle.
b. Disconnect the VSS connector.
c. Switch the ignition to ON (engine off).
d. Measure the voltage at VSS connector terminal A (harness-side).
If there is a ...
