Mazda 3 Service Manual: Instrument Cluster Removal/Installation
CAUTION:
-
When replacing the instrument cluster, the configuration procedure must be performed before removing the instrument cluster. Replacing the instrument cluster without performing the configuration procedure will result in system malfunction.
1. Perform the instrument cluster configuration when replacing it..
2. Disconnect the negative battery cable..
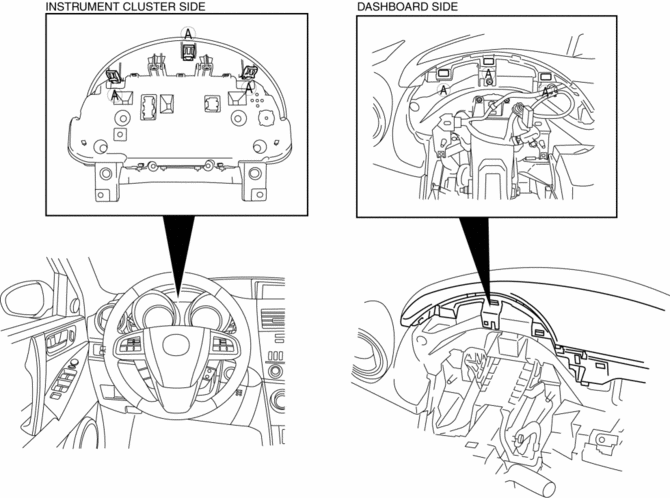
3. Remove the column cover. (upper).
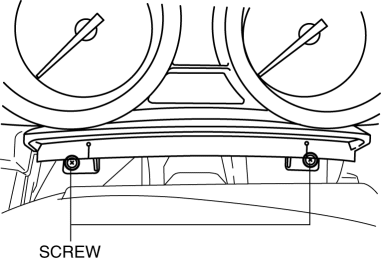
4. Remove the screws.
5. Pull the instrument cluster outward and remove it
6. Disconnect the connector.
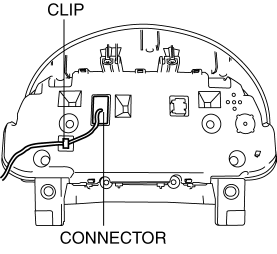
7. Remove the clip.
8. Install in the reverse order of removal.
9. Program the immobilizer system-related parts when replacing the instrument cluster. (With keyless entry system).
CAUTION:
-
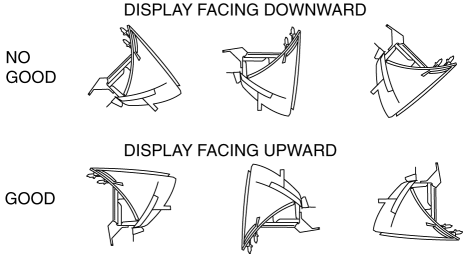
The removed instrument cluster should be placed with the display side up to prevent grease from leaking from the meters.
 Instrument Cluster Inspection
Speedometer
Using a speedometer tester
CAUTION:
When only the front or the rear wheels are driven using a speedometer tester,
the ABS or DSC may determine that the vehicle speed signal is ...
 Instrumentation/Driver Info. Personalization Features Setting Procedure
Instrument Cluster
1. Connect the M-MDS (IDS) to the DLC–2.
2. After the vehicle is identified, select the following items from the initial
screen of the M-MDS.
Select the “Module ...
Other materials:
Air Filter Inspection [Mzr 2.0, Mzr 2.5]
Except for Mexico
Airflow inspection
1. Remove the air filter..
2. Blow from port A and verify that there is airflow from port B.
If there is no airflow, replace the air filter..
3. Blow from port B and verify that there is airflow from port A.
If there is no airflow, r ...
Rear Spoiler Removal/Installation
4SD
1. Remove the trunk lid trim..
2. Remove the nuts.
3. While cutting the double-sided adhesive tape using a flathead screwdriver
or a razor, separate the rear spoiler from the trunk lid.
WARNING:
Using a razor with bare hands can cause injury. Always wear gloves when usin ...
Parking Support Brake function (pedestrians rear of the vehicle)
The Subaru Solterra is equipped with a rear camera-based detection
system capable of identifying pedestrians behind the vehicle while reversing. When
a pedestrian is detected and the system determines that collision risk is elevated,
an audible warning is issued. If the danger becomes critical ...
