Mazda 3 Service Manual: Instrumentation/Driver Info. Personalization Features Setting Procedure
Instrument Cluster
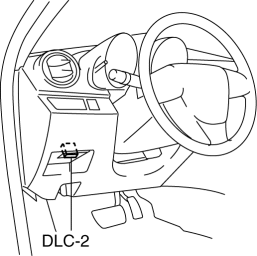
1. Connect the M-MDS (IDS) to the DLC–2.
2. After the vehicle is identified, select the following items from the initial screen of the M-MDS.
-
Select the “Module Programming”.
3. Then, select items from the screen menu in the following order.
-
Select “Programmable Parameters”.
-
Select “Warning Lamps / Chimes”.
4. Select an item name, and then select option.
|
M-MDS display |
Function |
Initial setting |
Setting content |
Control unit |
|
Advanced key buzzer volume |
The advanced keyless entry and push button start system warning alarm can be adjusted. |
Loud |
Loud / Low |
Instrument cluster |
|
Average fuel consumption resetting method |
The average fuel economy display and the trip A display in the instrument cluster can be reset simultaneously, or only the average fuel economy display can be selected for resetting. |
On MID only |
When refueling and on MID / On MID only / When resetting tripmeter A and on MID |
Instrument cluster |
|
Decoration illumination |
The decoration illumination can be operable to operable or inoperable. |
Enabled |
Disabled / Enabled |
Instrument cluster |
|
Driver beltminder status |
The driver seat beltminder can be operable to operable or inoperable. |
Enabled |
Enabled / Disabled |
Instrument cluster |
|
Fuel logic |
Change fuel gauge needle speed correction. |
Enabled |
Disabled / Enabled NOTE:
|
Instrument cluster |
|
Key reminder buzzer volume |
The key reminder warning alarm can be adjusted. |
Loud |
Low / Loud |
Instrument cluster |
|
Passenger seat belt warning light/alarm |
A combination of the passenger seat belt warning alarm and warning light operations can be selected. |
Light Enabled/Alarm Enabled |
Light Disabled/Alarm Disabled / Light Enabled/Alarm Enabled / Light Enabled/Alarm Disabled |
Instrument cluster |
|
Light reminder buzzer volume |
The headlights-on reminder warning alarm can be adjusted. |
Loud |
Not equipped / No alarm / Low / Loud |
Instrument cluster |
|
Trip meter indication unit |
Display unit can be selected. (Trip B only) |
0.1 |
0.1 / 1 |
Instrument cluster |
|
Turn signal buzzer volume |
The turn indicator alarm sound volume can be adjusted. |
Loud |
Loud / Not equipped / Low |
Instrument cluster |
|
Welcome Mode |
The welcome mode can be operable to operable or inoperable. |
Enabled |
Enabled / Disabled |
Instrument cluster |
|
RVM/BSM buzzer volume |
The blind spot monitoring (BSM) warning alarm sound volume can be adjusted. |
Loud |
Not equipped / Low / Loud |
Instrument cluster |
Blind Spot Monitoring (BSM) Control Module
1. Connect the M-MDS (IDS) to the DLC–2.
2. After the vehicle is identified, select the following items from the initial screen of the M-MDS.
-
Select the “Module Programming”.
3. Then, select items from the screen menu in the following order.
-
Select “Programmable Parameters”.
-
Select “BSM”.
4. Select an item name, and then select option.
|
M-MDS display |
Function |
Initial setting |
Setting content |
Control unit |
|
BSM buzzer |
The blind spot monitoring (BSM) system warning alarm can be set to operable or inoperable. |
Enabled |
Disabled / Enabled |
Blind spot monitoring (BSM) control module |
Multi Information Display
1. Press the INFO switch until the SETTINGS screen is displayed.
2. Select PREFERENCES by pressing the Enter (up/down) switch up or down, and then press the Enter (up/down) switch.
3. Select the setting item you want to change by pressing the Enter (up/down) switch up or down, and then press the Enter (up/down) switch.
4. Select the desired setting by pressing the Enter (up/down) switch up or down, and then press the Enter (up/down) switch.
|
Multi information display |
Function |
Initial setting |
Setting content |
Control unit |
|
Distance unit |
Display unit can be selected. |
mile or km |
km / mile |
Multi information display |
|
Temperature unit |
Display unit can be selected. |
°F or °C |
°C / °F |
Multi information display |
|
Display language |
Display language can be selected. |
English, French or Spanish |
English / French / German / Italian / Spanish |
Multi information display |
 Instrument Cluster Removal/Installation
CAUTION:
When replacing the instrument cluster, the configuration procedure must be
performed before removing the instrument cluster. Replacing the instrument cluster
without performing ...
 PID/Data Monitor Inspection [Instrument Cluster]
1. Connect the M-MDS (IDS) to the DLC-2.
2. After the vehicle is identified, select the following items from the initialization
screen of the IDS.
a. Select “DataLogger”.
b. Select “ ...
Other materials:
Front Fog Light Removal/Installation
Except Mazdaspeed3
1. Disconnect the negative battery cable..
2. Remove the front bumper..
3. Pull the wiring harness from the hook in the direction of the arrow shown
in the figure and remove it.
4. Disconnect the connector.
5. Pull the wiring harness in the direction of the arrow (2 ...
Cleaning the Window Interiors
If the windows become covered with an
oily, greasy, or waxy film, clean them with
glass cleaner. Follow the directions on the
container.
CAUTION
Do not scrape or scratch the inside of
the window glass. It could damage the
thermal fi laments and the antenna lines.
When wash ...
Rear Crossmember Removal/Installation
CAUTION:
Performing the following procedures without first removing the ABS wheel-speed
sensor may possibly cause an open circuit in the wiring harness if it is pulled
by mistake. Before performing the following procedures, disconnect the ABS wheel-speed
sensor wiring harness connec ...
