Mazda 3 Service Manual: Auto Leveling Sensor Inspection
1. Disconnect the negative battery cable..
2. Remove the auto leveling sensor..
3. Connect the three dry cell batteries (1.5 V) in a series.
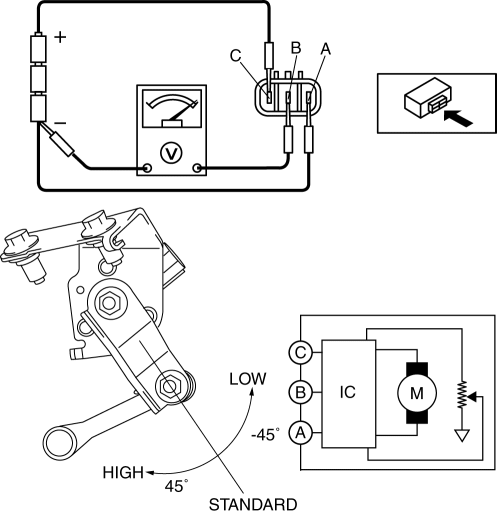
4. Connect auto leveling sensor terminal A to the battery’s minus terminal, and terminal C to the battery’s plus terminal, and apply 4.5 V of voltage between terminals A and C.
5. Connect the tester as shown in the figure.
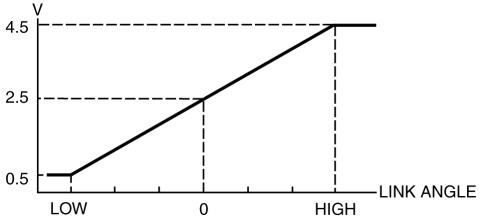
6. When slowly moving the link up and down, verify that the shift is linear while the voltage is 0.5 to 4.5 V.
-
If the voltage cannot be verified as indicated in the graph, replace the auto leveling sensor.
 General
...
 Auto Leveling Sensor Removal/Installation
1. Disconnect the negative battery cable..
2. Lift up the vehicle.
3. Disconnect the quick release connector. (charcoal canister side).
4. Remove in the order indicated in the table.
...
Other materials:
Advanced Park cancelation/ suspension
■ Assistance will be canceled when
Under the following conditions, the Subaru Solterra Advanced Park system will
automatically terminate its operation. When this occurs, immediately take control
by firmly holding the steering wheel and pressing the brake pedal to safely stop
the Subaru Solt ...
Drive Belt Removal/Installation [Skyactiv G 2.0]
WARNING:
A hot engine can cause severe burns. Turn off the engine and wait until it
is cool before servicing.
NOTE:
Remove/install the drive belt from the underside of the vehicle.
Generator Drive Belt Removal/Installation
CAUTION:
To prevent damage to the dri ...
Crankshaft Position (CKP) Sensor Removal/Installation [Mzr 2.0, Mzr 2.5]
Removal
CAUTION:
When foreign material such as an iron chip is on the CKP sensor, it can cause
abnormal output from the sensor because of flux turbulence and adversely affect
the engine control. Be sure there is no foreign material on the CKP sensor when
replacing.
Do not a ...
