Mazda 3 Service Manual: Back Up Light Switch Removal/Installation [A26 M R]
1. Disconnect the negative battery cable.
2. Disconnect the back-up light switch connector.
3. Remove the aerodynamic under cover No.2..
4. Remove the back-up light switch with the gasket.
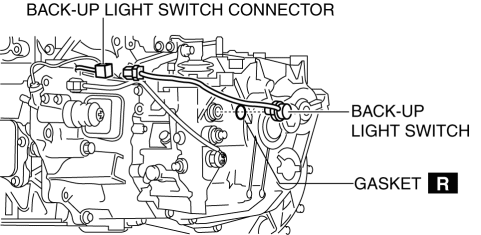
5. Install a new gasket and the back-up light switch to the transaxle case.
-
Tightening torque
-
29—52 N·m {3.0—5.3 kgf·m, 22—38 ft·lbf}
6. Install the aerodynamic under cover No.2..
7. Connect the back-up light switch connector.
8. Connect the negative battery cable.
 Back Up Light Switch Inspection
1. Disconnect the negative battery cable..
2. Remove the battery component. (ex: battery, battery tray and PCM component)
(G35-MR,G66M-R).
3. Remove the aerodynamic under cover No.2. (G35-MR,G66 ...
 Back Up Light Switch Removal/Installation [C66 M R]
1. Remove the battery cover..
2. Disconnect the negative battery cable..
3. Remove the aerodynamic under cover No.2..
4. Remove in the order indicated in the table.
5. Install in the reverse o ...
Other materials:
Locking, Unlocking with Request
Switch (With the advanced keyless
function)
All doors and the liftgate can be locked/
unlocked by pressing the request switch
on the front doors while the key is being
carried.
(5–door)
The request switch on the liftgate can only
be used to lock all doors and the liftgate.
Front doors
Liftgate (5-door Lock only)
To lock
To ...
Basic Operation Method
TOUCH & TAP
Touch or tap on the item indicated on the screen.
The operation is launched and the next item is displayed.
SLIDE
Touch the setting item displaying a slider bar.
Touch the slider with your finger and move to the desired level.
SWIPE
Touch the screen with ...
Body And Accessories
ABBREVIATIONS
ACC
Accessories
AUX
Auxiliary jack
CAN
Controller Area Network
DLC
Data Link Connector
GND
Ground
LH
Left Hand
...
