Mazda 3 Owners Manual: Brake/Clutch Fluid
Inspecting Brake/Clutch Fluid Level
| WARNING
If the brake/clutch fl uid level is low, have
the brakes inspected:
A low brake/clutch fl uid level is
dangerous. A low level could indicate brake lining wear or a brake system leak which could cause the brakes to fail and lead to an accident. |
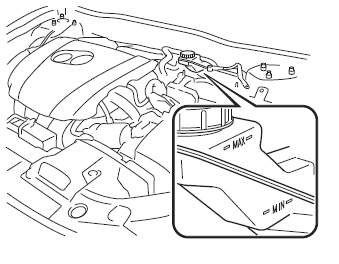
The brakes and clutch draw fluid from the same reservoir.
Inspect the fluid level in the reservoir regularly. It should be kept between the MAX and MIN lines.
The level normally drops with accumulated distance, a condition associated with wear of brake and clutch linings. If it is excessively low, have the brake/clutch system inspected by an Authorized Mazda Dealer.
 Engine Coolant
Inspecting Coolant Level
WARNING
Do not use a match or live fl ame in the
engine compartment. DO NOT ADD
COOLANT WHEN THE ENGINE IS HOT:
A hot engine is dangerous. If the
engine ...
 Washer Fluid
Inspecting Washer Fluid Level
WARNING
Use only windshield washer fl uid or
plain water in the reservoir:
Using radiator antifreeze as washer
fl uid is dangerous. If sprayed on the
...
Other materials:
Rear Door Latch And Lock Actuator Inspection
1. The following actuator and switch are integrated with the rear door latch
and lock actuator. Inspect the rear door latch and lock actuator according to each
inspection procedure for the following items.
Rear door lock actuator.
Rear door latch switch.
Rear door lock-li ...
ABS HU/CM Inspection
1. Disconnect the ABS HU/CM connector..
2. Connect the negative battery cable..
3. Attach the tester lead to the ABS HU/CM wiring harness-side connector and
inspect the voltage, continuity, or resistance according to the standard (reference
value) in the table below.
Standard (reference)
...
Back Up Light Switch Inspection
1. Disconnect the negative battery cable..
2. Remove the battery component. (ex: battery, battery tray and PCM component)
(G35-MR,G66M-R).
3. Remove the aerodynamic under cover No.2. (G35-MR,G66M-R,C66M-R).
4. Disconnect the back-up light switch connector..
5. Verify that the continuity be ...
