Mazda 3 Service Manual: Trunk Lid Stay Damper Disposal
NOTE:
-
The gas in the trunk lid stay damper is colorless, odorless, and non-toxic.
1. Wear protective eye wear.
2. Lay the trunk lid stay damper flat.
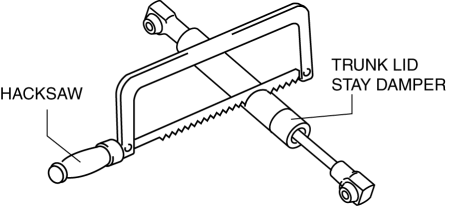
3. Hacksaw 2—3 mm {
0.08—0.11 in}
into the trunk lid stay damper using a hacksaw, and allow the gas to escape from the trunk lid stay damper.
4. Verify that the gas has escaped from the trunk lid stay damper.
5. Discard the trunk lid stay damper.
 Trunk Lid Removal/Installation
WARNING:
Removing the trunk lid stay damper without supporting the trunk lid can be
dangerous. The trunk lid may fall and injure you. Be sure to open the trunk
lid completely and support ...
 Trunk Side Trim Removal/Installation
4SD
Left-side
1. Remove the following parts:
a. Rear scuff plate.
b. Tire house trim.
c. Trunk mat.
d. Trunk board.
e. Trunk end trim.
f. Service hole cover
2. Remove the fasteners.
...
Other materials:
Service Cautions
Injury/damage Prevention Precautions
Depending on the vehicle, the cooling fan may operate suddenly even when
the ignition is switched to off. Therefore, keep hands and tools away from the
cooling fan even if the cooling fan is not operating to prevent injury to personnel
or damage t ...
Steering Gear And Linkage Removal/Installation
CAUTION:
Performing the following procedures without first removing the ABS wheel-speed
sensor may possibly cause an open circuit in the wiring harness if it is pulled
by mistake. Before performing the following procedures, disconnect the ABS wheel-speed
sensor connector (axle side) ...
Joint Shaft Disassembly [Mzr 2.3 Disi Turbo]
1. Disassemble in the order indicated in the table.
1
Joint shaft component
.
2
Bearing
.
3
Dust seal (LH)
4
Joint shaft
5
Dust seal (RH)
...
