Mazda 3 Service Manual: Oil Control Valve (OCV) Inspection [Skyactiv G 2.0]
Coil Resistance Inspection
1. Remove the battery cover..
2. Disconnect the negative battery cable..
3. Remove the plug hole plate..
4. Disconnect the OCV connector.
5. Measure the resistance between terminals A and B using an ohmmeter.

-
OCV coil resistance
-
6.9—7.5 ohms [20°C {68°F}]
-
If not as specified, replace the OCV..
6. Install in the reverse order of removal.
Spool Valve Operation Inspection
1. Remove the battery cover..
2. Disconnect the negative battery cable..
3. Remove the OCV..
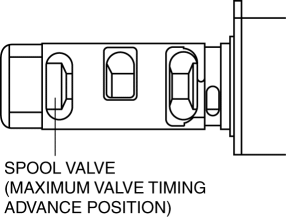
4. Verify that the spool valve in the OCV is in the maximum valve timing advance position as indicated in the figure.
-
If not as specified, replace the OCV..
5. Verify that the battery is fully charged..
-
If not as specified, recharge the battery..
NOTE:
-
When applying battery positive voltage between the OCV terminals, the connection can be either of the following:
-
Positive battery cable to terminal A, negative battery cable to terminal B
-
Positive battery cable to terminal B, negative battery cable to terminal A
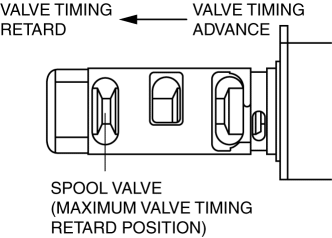
6. Apply battery positive voltage between the OCV terminals and verify that the spool valve operates and moves to the maximum valve timing retard position.
-
If not as specified, replace the OCV..
7. Stop applying battery positive voltage and verify that the spool valve returns to the maximum valve timing advance position.
-
If not as specified, replace the OCV..
8. Install the OCV..
 Oil Control Valve (OCV) Inspection [Mzr 2.3 Disi Turbo]
Coil Resistance Inspection
1. Remove the battery cover..
2. Disconnect the negative battery cable..
3. Disconnect the OCV connector.
4. Measure the coil resistance between terminals A and B usi ...
 Oil Control Valve (OCV) Removal/Installation [Mzr 2.0, Mzr 2.5]
1. Remove the battery cover..
2. Disconnect the negative battery cable..
3. Remove the plug hole plate..
4. Disconnect the wiring harness.
5. Remove the ignition coils..
6. Remove the ventil ...
Other materials:
Emergency assistance
SUBARU SOLTERRA CONNECT
SUBARU SOLTERRA CONNECT is an advanced subscription-based telematics
system designed for the Subaru Solterra, utilizing Global Positioning System (GPS)
technology along with integrated cellular communication to deliver enhanced safety,
security, and convenience feature ...
Scheduled Maintenance (U.S.A., Canada, and Puerto Rico)
Follow Schedule 1 if the vehicle is operated mainly where none of the
following conditions
(severe driving conditions)apply.
Repeated short-distance driving
Driving in dusty conditions
Driving with extended use of brakes
Driving in areas where salt or other corrosive materials are used
...
Transaxle Fluid Temperature (Tft) Sensor Removal/Installation [FS5 A EL]
WARNING:
A hot transaxle and ATF can cause severe burns. Turn off the engine and wait
until they are cool.
1. Remove the primary control valve body.
a. Remove the battery cover..
b. Disconnect the negative battery cable.
c. Remove the aerodynamic under cover NO.2..
d. Clean ...
