Mazda 3 Service Manual: Oil Control Valve (OCV) Inspection [Mzr 2.3 Disi Turbo]
Coil Resistance Inspection
1. Remove the battery cover..
2. Disconnect the negative battery cable..
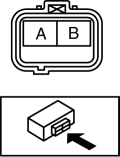
3. Disconnect the OCV connector.
4. Measure the coil resistance between terminals A and B using a tester.
-
If not as specified, replace the OCV..
-
OCV coil resistance
-
6.9—7.9 ohms [20°C {68°F}]
5. Install in the reverse order of removal.
Spool Valve Operation Inspection
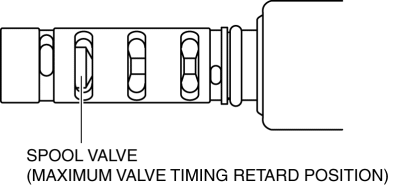
1. Remove the OCV..
2. Verify that the spool valve in the OCV is in the maximum valve timing retard position as shown in the figure.
-
If not as specified, replace the OCV..
3. Verify that the battery is fully charged..
-
Recharge it if necessary..
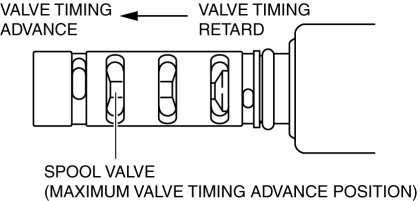
4. Apply battery positive voltage between the OCV terminals and verify that the spool valve operates and moves to the maximum valve timing advance position.
-
If not as specified, replace the OCV..
NOTE:
-
When applying battery positive voltage between the OCV terminals, the connection can be either of the following:
-
Positive battery cable to terminal A, negative battery cable to terminal B
-
Positive battery cable to terminal B, negative battery cable to terminal A
5. Stop applying battery positive voltage and verify that the spool valve returns to the maximum valve timing retard position.
-
If not as specified, replace the OCV..
6. Install the OCV..
 Oil Control Valve (OCV) Inspection [Mzr 2.0, Mzr 2.5]
Coil Resistance Inspection
1. Remove the battery cover..
2. Disconnect the negative battery cable..
3. Remove the plug hole plate..
4. Disconnect the OCV connector.
5. Measure the resistance ...
 Oil Control Valve (OCV) Inspection [Skyactiv G 2.0]
Coil Resistance Inspection
1. Remove the battery cover..
2. Disconnect the negative battery cable..
3. Remove the plug hole plate..
4. Disconnect the OCV connector.
5. Measure the resistance ...
Other materials:
How to use DC charging
This section provides a comprehensive overview of the DC fast charging
procedure for the Subaru Solterra traction battery, allowing drivers to quickly
and efficiently recharge when needed.
When using a DC charger with the Subaru Solterra, always review and
follow the specific instructions pro ...
For safe driving
For optimal safety in your Subaru Solterra, always adjust your seating
position, mirrors, and driving posture correctly before starting your journey.
Correct driving posture
Adjust the seatback angle so that you sit upright comfortably without needing
to lean forward while steering y ...
Steering Wheel
WARNING
Never adjust the steering wheel while
the vehicle is moving:
Adjusting the steering wheel while
the vehicle is moving is dangerous.
Moving it can very easily cause the
driver to abruptly turn to the left or
right. This can lead to loss of control or
an accident ...
