Mazda 3 Service Manual: C Pillar Trim Removal/Installation
4SD
1. Remove the following parts:
a. Rear seat cushion.
b. Rear scuff plate.
c. Tire house trim.
2. Partially peel back the seaming welt.
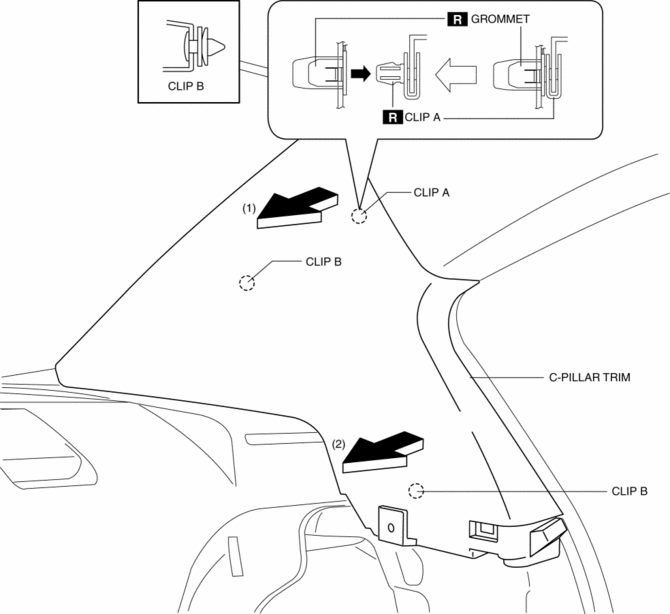
3. Pull the C-pillar trim in the direction of the arrow (1), (2) shown in the figure, then detaching clip A and B.
4. Cut the lead wire connecting clip A and grommet using a nipper and pull out the C-pillar trim in the direction of the arrow shown in the figure, while remove the tab C.
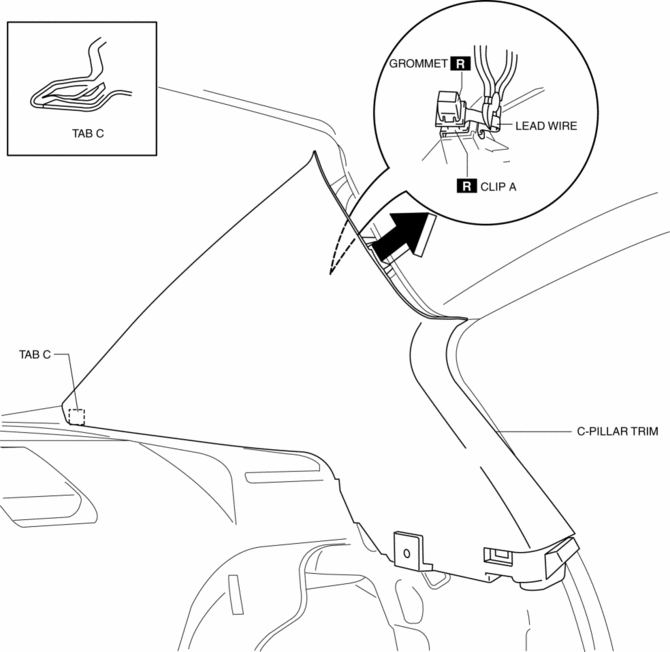
CAUTION:
-
When removing the C-pillar trim, be careful not to damage the tab C.
5. Move the hook in the direction of arrows (1) and (2) shown in the figure using a flathead screwdriver and detach it from the rear pillar inner panel.
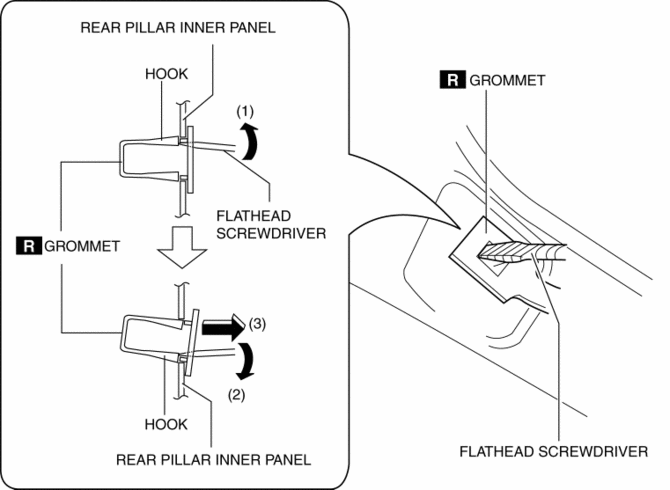
6. Remove the grommet in the direction of the arrow (3) shown in the figure.
7. When installing the C-pillar, install the new clip A and grommet to the C-pillar trim in advance.
8. Install in the reverse order of removal.
5HB
1. Remove the following parts:
a. Rear scuff plate.
b. Tire house trim.
c. Trunk side upper trim.
d. Trunk side trim.
2. Partially peel back the seaming welt.
3. Remove the fastener.
4. Pull the C-pillar trim in the direction of the arrow (1), (2) shown in the figure, then remove the clips A, pin B and C.
5. Pull the C-pillar trim in the direction of the arrow (3) shown in the figure, then remove the clips D and tab E.
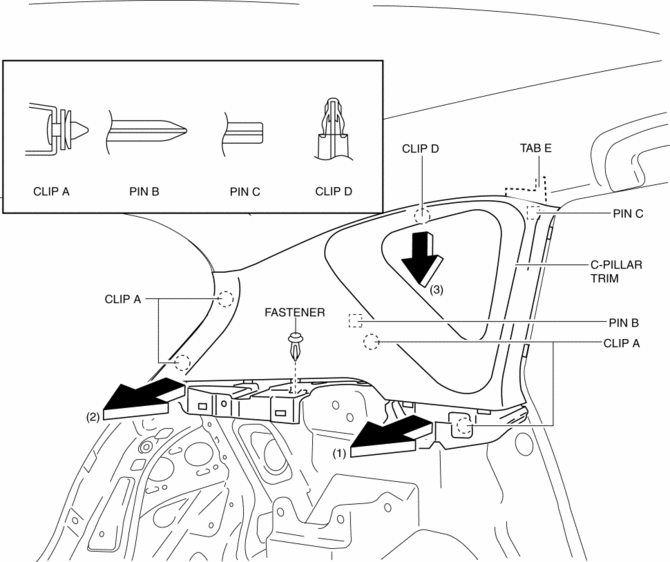
6. Remove the C-pillar trim.
7. Install in the reverse order of removal.
 B Pillar Upper Trim Removal/Installation
1. Remove the following parts:
a. Adjuster anchor cover.
b. Upper anchor installation bolts on the front seat belt.
c. Front scuff plate.
d. Rear scuff plate.
2. Partially peel back the seam ...
 Center Cover Removal/Installation
1. Disconnect the negative battery cable..
2. Remove the center panel..
3. Remove the upper clumn cover..
4. Remove the instrument cluster..
5. Pull the center cover in the direction of arrow ...
Other materials:
Decoration Panel Removal/Installation
1. Remove the following parts:
a. Passenger-side front scuff plate.
b. Passenger-side front side trim.
c. Glove compartment.
d. Passenger-side lower panel.
2. Remove the screw.
3. Pull the decoration panel in the direction of the arrow (1), (2) shown in
the figure, while remove the hoo ...
Sae Standards
In accordance with new regulations, SAE (Society of Automotive Engineers)
standard names and abbreviations are now used in this manual. The table below
lists the names and abbreviations that have been used in Mazda manuals up to
now and their SAE equivalents.
...
Audio Unit Disassembly/Assembly
CAUTION:
When disassembling the audio unit, it could get scratched if it is placed
directly on the ground. When disassembling the audio unit, spread a soft cloth
underneath to perform the work.
1. Disassemble in the order indicated in the table.
2. Assemble in the reverse order ...
