Mazda 3 Service Manual: Center Panel Removal/Installation
1. Disconnect the negative battery cable..
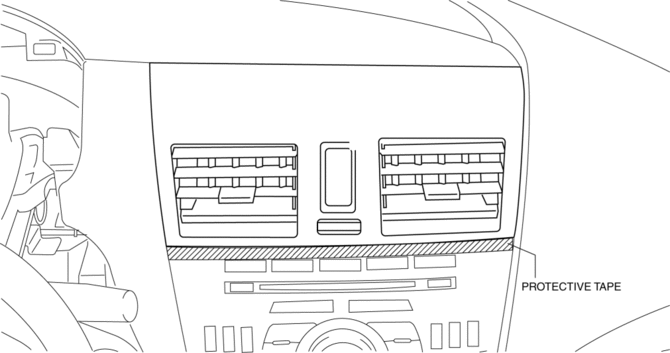
2. Affix protective tape to the position shown in the figure.
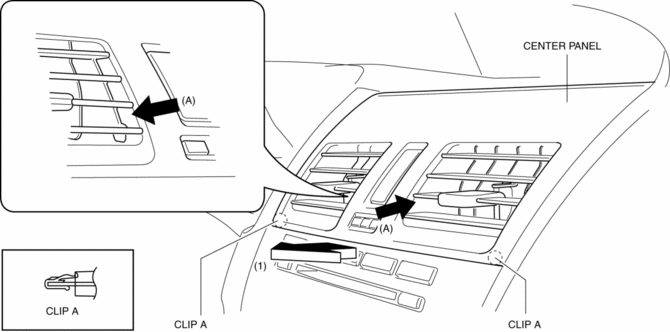
3. Hold parts (A) shown in the figure with your hands and pull the lower edge of the center panel in the direction of the arrow (1), and remove clips A.
CAUTION:
-
Be careful not to damage the center ventilator grille fins by touching them with your fingers. When holding the positions shown by the arrow (A) in the figure, be careful not to touch the fins.
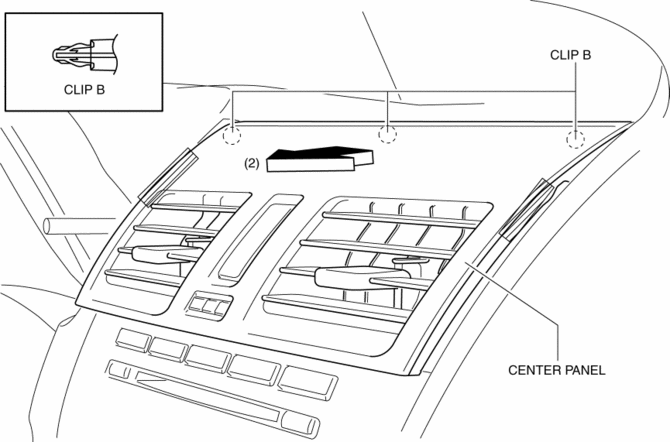
4. Hold the cross-hatched areas in the figure with your hands and pull the center panel in the direction of the arrow (2), and remove clips B.
CAUTION:
-
If the center panel is removed forcefully it could result in damage to the hazard warning switch connector wiring harness. Carefully pull the center panel until clips B are pulled out.
5. Remove the center panel.
6. Disconnect the hazard warning switch connector.
7. Install in the reverse order of removal.
 Center Cover Removal/Installation
1. Disconnect the negative battery cable..
2. Remove the center panel..
3. Remove the upper clumn cover..
4. Remove the instrument cluster..
5. Pull the center cover in the direction of arrow ...
 Column Cover Removal/Installation
1. Pull down the steering wheel.
2. Pull the upper column cover in the direction of the arrow in the order of
(1) and (2), then remove the upper column cover while detaching the hooks and pins.
...
Other materials:
Seat Warmer
The front seats are electrically heated. The
ignition must be switched ON.
Press the seat warmer switch to illuminate
the indicator light while the ignition
is switched ON. The mode changes as
follows each time the seat warmer switch
is pressed.
WARNING
Be careful when using t ...
Dashboard Removal/Installation
1. Set the air intake mode to FRESH.
2. Set the air mix mode to MAX COLD.
3. Disconnect the negative battery cable..
4. Remove the following parts:
a. Front doors.
b. Front scuff plate.
c. Front side trim.
d. Dashboard under cover.
e. Glove compartment.
f. Upper panel.
g. Shift l ...
Fuel Gauge Sender Unit Inspection
MZR 2.3 DISI Turbo, SKYACTIV-G 2.0
NOTE:
The fuel gauge sender unit is integrated with the fuel pump unit.
1. Disconnect the negative battery cable..
2. Remove the rear seat cushion..
3. Remove the fuel pump unit..
4. Verify that the resistance between terminals A and C of the f ...
