Mazda 3 Owners Manual: Replacing Windshield Wiper Blades
When the wipers no longer clean well, the blades are probably worn or cracked.
Replace them.
| CAUTION To prevent damage to the wiper arms and other components, do not try to sweep the wiper arm by hand. |
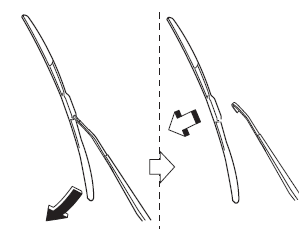
NOTE When raising both windshield wiper arms, raise the driver's side wiper arm first.
When lowering the wiper arms, slowly lower the wiper arm from the passenger's side first while supporting it with your hand. Forcefully lowering the wiper arms could damage the wiper arm and blade, and may scratch or crack the windshield.
- Raise the wiper arm.
- Open the clip and slide the blade assembly in the direction of the arrow
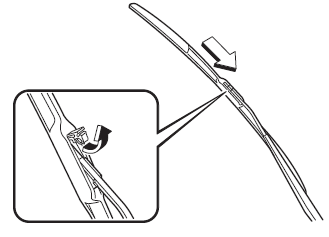
- Tilt the blade assembly and remove it from the arm.
| CAUTION To prevent damage to the windshield let the wiper arm down easily, do not let it slap down on the windshield. |
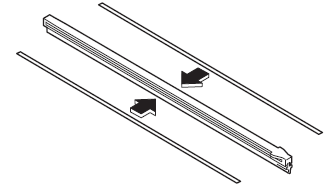
- Pull down the blade rubber and slide it out of blade holder.

- Remove the metal stiffeners from each blade rubber and install them in the new blade.
CAUTION
|
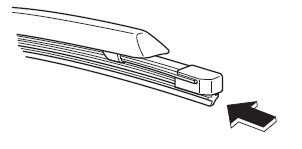
- Carefully insert the new blade rubber.
Then install the blade assembly in the reverse order of removal.
 Wiper Blades
CAUTION
Hot waxes applied by automatic car
washers have been known to aff ect the
wiper's ability to clean windows.
To prevent damage to the wiper blades,
do not use gasolin ...
 Replacing Rear Window Wiper Blade (5-Door)
When the wiper no longer cleans well, the
blade is probably worn or cracked.
Replace it.
CAUTION
To prevent damage to the wiper arm
and other components, do not move
the wiper by ...
Other materials:
Oil Control Valve (OCV) Removal/Installation [Skyactiv G 2.0]
WARNING:
A hot engine can cause severe burns. Turn off the engine and wait until it
is cool before servicing.
1. Remove the battery cover..
2. Disconnect the negative battery cable..
3. Remove the plug hole plate..
4. Remove the ignition coil/ion sensors..
5. Remove the cyli ...
Shift-Lock Override
If the selector lever will not move from P
using the proper shift procedure, continue
to hold down the brake pedal.
Remove the shift-lock override cover
using a cloth-wrapped flat head
screwdriver.
Insert a screwdriver and push it down.
Press and hold the lock-release button.
...
Front Beltline Molding Removal/Installation
1. Fully open the front door glass.
2. Disconnect the negative battery cable..
3. Remove the inner garnish..
4. Remove the front door trim..
5. Remove the power outer mirror..
6. Remove clip A using a fastener remover and pull the front beltline molding
in the direction of the arrow (1) ...
