Mazda 3 Service Manual: Combination Switch Disassembly/Assembly
CAUTION:
-
Handling the air bag module improperly can accidentally deploy the air bag module, which may seriously injure you. Read the air bag system service warnings and cautions before handling the air bag module..
1. Switch the ignition to off.
2. Disconnect the negative battery cable and wait for 1 min or more.
.
3. Remove the following parts:
a. Driver-side air bag module.
b. Steering wheel.
c. Column cover.
d. Clock spring.
e. Combination switch.
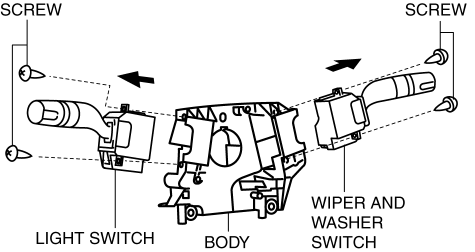
4. Remove the screws shown in the figures, then pull the light switch, and the wiper and washer switch in the direction of the arrow respectively to remove them.
5. Assemble in the reverse order of disassembly.
 Steering Wheel And Column Removal/Installation [Without Advanced Keyless Entry
And Push Button Start System]
Steering Wheel And Column Removal/Installation [Without Advanced Keyless Entry
And Push Button Start System]
WARNING:
Handling the air bag module improperly can accidentally operate (deploy)
the air bag module, which may seriously injure you. Read the service warnings
before handling the air ba ...
 Combination Switch Removal/Installation
CAUTION:
Handling the air bag module improperly can accidentally deploy the air bag
module, which may seriously injure you. Read the air bag system service warnings
and cautions before h ...
Other materials:
Air Bag Module And Pre Tensioner Seat Belt Deployment Procedures [Two Step Deployment
Control System]
WARNING:
A live (undeployed) air bag module or pre-tensioner seat belt may accidentally
operate (deploy) when it is disposed of and cause serious injury. Do not dispose
of a live (undeployed) air bag module and pre-tensioner seat belt. If the SSTs
(Deployment tool and Adapter harnes ...
Luggage compartment features
Cargo hooks
In the Subaru Solterra, cargo hooks are designed to provide convenient anchoring
points for securing loose items within the luggage compartment, helping to prevent
movement during driving.
Lift the hooks upward when needed for use, ensuring proper positioning before
attaching str ...
Customer Assistance (Mexico)
Your complete and permanent satisfaction is our business. We are here to
serve you. All
Authorized Mazda Dealers have the knowledge and the tools to keep your Mazda
vehicle in
top condition.
If you have any questions or recommendations for improvement regarding the
service of
your Mazda ...
