Mazda 3 Owners Manual: Component Parts
Audio unit
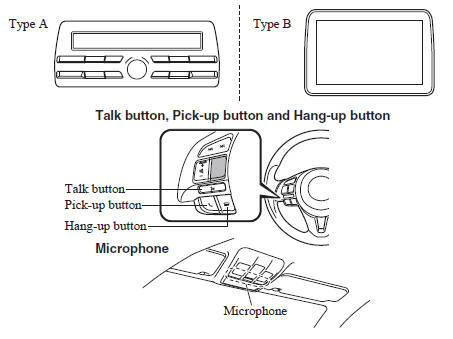
Microphone (hands-free)
The microphone is used for speaking voice commands or when making a Hands-free call.
Talk button, Pick-Up button and Hang-Up button (hands-free) The basic functions of Bluetooth ® Hands-Free can be used for such things as making calls or hanging up using the talk, pick-up and hang-up buttons on the steering wheel.
Commander switch (Type B)
The commander switch is used for volume adjustment and display operation. Tilt or turn the commander knob to move the cursor. Press the commander knob to select the icon.
Volume adjustment
The power/volume dial of the audio unit *1 or the volume dial of the commander switch *2 is used to adjust the volume. Turn the dial to the right to increase volume, to the left to decrease it.
The volume can also be adjusted using the volume button on the steering wheel.
*1 Type A
*2 Type B
NOTE If the volume is lower compared to other audio modes, increase the volume from the device side.
(Type B)
Conversation volume and the volume of the voice guidance and ringtone can each be set in advance.
- Select the
 icon on the home
screen to display the Communication screen. - Select
 .
. - Adjust the
 and the
 using the slider.
 Bluetooth®
Bluetooth ® Hands-Free outline
When a Bluetooth ® device (mobile phone) is connected to the vehicle's
Bluetooth ® unit via
radio wave transmission, a call can be made or received by pressing th ...
 Bluetooth ® Preparation (Type A)
Bluetooth ® Hands-Free Preparation
Pairing code setting
The 4-digit pairing code setting for
registration of your cell phone (pairing)
can be set beforehand.
NOTE
The initial setting value is Ō ...
Other materials:
Trunk Lid Opener Cable Removal/Installation
1. Disconnect the negative battery cable..
2. Remove the following parts:
a. Front seat (LH)(See FRONT SEAT REMOVAL/INSTALLATION.)
b. Front scuff plate (LH).
c. Rear scuff plate.
d. B-pillar lower trim.
e. Rear seat cushion.
f. Rear seat back.
g. Tire house trim (LH).
h. Trunk end ...
Windshield Installation
WARNING:
Using a utility knife with bare hands can cause injury. Always wear gloves
when using a utility knife.
CAUTION:
If a door is opened or closed when all the window glass is closed, the resulting
change in air pressure could cause the sealant to crack preventing the ...
EGR Valve Inspection [Mzr 2.0, Mzr 2.5]
Resistance Inspection
1. Remove the battery cover..
2. Disconnect the negative battery cable..
3. Disconnect the EGR valve connector.
4. Measure the resistance between the EGR valve terminals.
EGR valve terminal
Resistance inspection (ohm)
...
