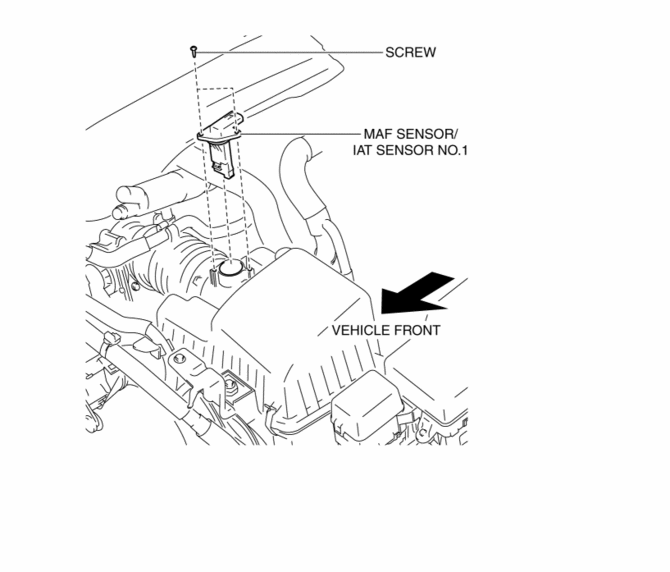
Mazda 3 Service Manual: Mass Air Flow (MAF) Sensor/Intake Air Temperature (Iat) Sensor No.1 Removal/Installation [Skyactiv G 2.0]
CAUTION:
-
Be careful not to hit the sensor element or allow foreign matter to get on it during sensor removal/installation. If the sensor element is hit or foreign matter gets on it, an error may occur in the sensor output signal resulting in deterioration in the engine control.
NOTE:
-
Because the IAT sensor No.1 is integrated in the MAF sensor, replacing the IAT sensor No.1 includes replacement of the MAF sensor/IAT sensor No.1.
1. Remove the battery cover..
2. Disconnect the negative battery cable..
3. Disconnect the MAF sensor/IAT sensor No.1 connector.
4. Remove the MAF sensor/IAT sensor No.1.

5. Install in the reverse order of removal.
 Mass Air Flow (MAF) Sensor Inspection [Mzr 2.0, Mzr 2.5]
Visual Inspection
1. Remove the battery cover..
2. Disconnect the negative battery cable..
3. Disconnect the MAF/IAT sensor connector.
4. Remove the MAF/IAT sensor..
5. Visually inspect the M ...
 Lubrication
...
Other materials:
Variable Intake Air Shutter Valve Actuator Inspection [Mzr 2.0, Mzr 2.5]
Operation Inspection
1. Remove the air hose..
2. Disconnect the vacuum hose from the variable intake air shutter valve actuator.
3. Connect a vacuum pump to the variable intake air shutter valve actuator.
NOTE:
Covered with a hood, the rod of the variable intake air shutter valv ...
Relay Block Removal/Installation [With Advanced Keyless Entry And Push Button
Start System]
1. Disconnect the negative battery cable..
2. Remove the following parts:
a. Driver-side front scuff plate.
b. Driver-side front side trim.
c. Hood release lever.
d. Upper panel.
e. Shift knob (MTX)(See MANUAL TRANSAXLE SHIFT MECHANISM REMOVAL/INSTALLATION
[G66M-R].)(See MANUAL TRANSAX ...
Auto Leveling Sensor Inspection
1. Disconnect the negative battery cable..
2. Remove the auto leveling sensor..
3. Connect the three dry cell batteries (1.5 V) in a series.
4. Connect auto leveling sensor terminal A to the battery’s minus terminal, and
terminal C to the battery’s plus terminal, and apply 4.5 V of volta ...
