Mazda 3 Service Manual: Relay Block Removal/Installation [With Advanced Keyless Entry And Push Button Start System]
1. Disconnect the negative battery cable..
2. Remove the following parts:
a. Driver-side front scuff plate.
b. Driver-side front side trim.
c. Hood release lever.
d. Upper panel.
e. Shift knob (MTX)(See MANUAL TRANSAXLE SHIFT MECHANISM REMOVAL/INSTALLATION [G66M-R].)(See MANUAL TRANSAXLE SHIFT MECHANISM REMOVAL/INSTALLATION [A26M-R].)
f. Selector lever knob (ATX)(See AUTOMATIC TRANSAXLE SHIFT MECHANISM REMOVAL/INSTALLATION.)
g. Shift panel.
h. Side wall.
i. Console.
j. Lower panel.
k. Knee bolster.
3. Remove the nut and clip.

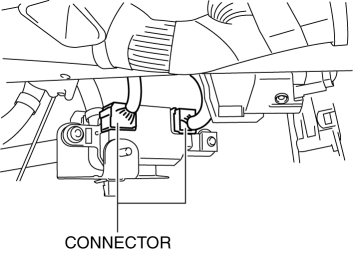
4. Disconnect the connectors.
5. Remove the nut and clip.
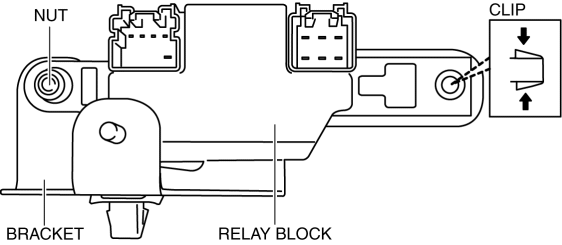
6. Remove the relay block from the bracket.
7. Install in the reverse order of removal.
 Relay Block Inspection [With Advanced Keyless Entry And Push Button Start System]
1. Disconnect the negative battery cable..
2. Remove the following parts:
a. Driver-side front scuff plate.
b. Driver-side front side trim.
c. Hood release lever.
d. Upper panel.
e. Shift ...
 Relay Inspection [Mzr 2.0, Mzr 2.5, Mzr 2.3 Disi Turbo]
Relay Type
Connector type
Part name
Type A
Front fog light relay
Headlight relay (HI)
Headlight rel ...
Other materials:
Front ABS Wheel Speed Sensor Removal/Installation
1. Remove in the order indicated in the table.
2. Install in the reverse order of removal.
3. After installation, verify that there is no twisting in the front ABS wheel-speed
sensor.
1
Connector
2
Front ABS wheel-speed sensor
...
Drive Belt Removal/Installation [Mzr 2.3 Disi Turbo]
1. Remove the aerodynamic under cover No.2 and splash shield as a single unit..
2. Rotate the drive belt auto tensioner in the direction shown in the figure
and remove the drive belt.
3. Install the drive belt.
4. Verify that the drive belt auto tensioner indicator mark does not exceed ...
Instrumentation/Driver Info. Personalization Features Setting Procedure
Instrument Cluster
1. Connect the M-MDS (IDS) to the DLC–2.
2. After the vehicle is identified, select the following items from the initial
screen of the M-MDS.
Select the “Module Programming”.
3. Then, select items from the screen menu in the following order.
Select “ ...
