Mazda 3 Service Manual: Relay Inspection [Mzr 2.0, Mzr 2.5, Mzr 2.3 Disi Turbo]
Relay Type
|
Connector type |
Part name |
|
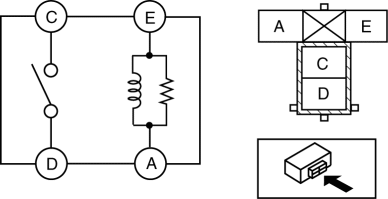
Type A |
|
|
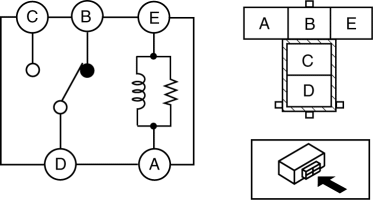
Type B |
|
|
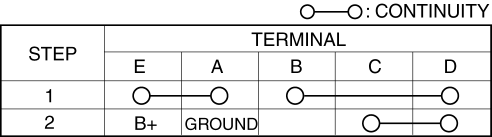
Type C |
|
|
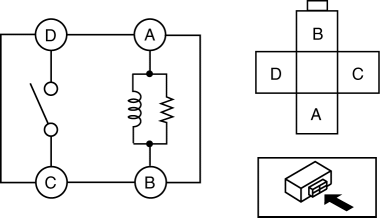
Type D |
|
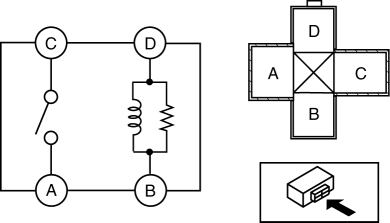
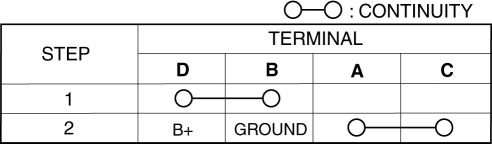
Type A
1. Verify that the continuity is as indicated in the table.
-
If not as indicated in the table, replace the relay.

Type B
1. Verify that the continuity is as indicated in the table.
-
If not as indicated in the table, replace the relay.
Type C
1. Verify that the continuity is as indicated in the table.
-
If not as indicated in the table, replace the relay.

Type D
1. Verify that the continuity is as indicated in the table.
-
If not as indicated in the table, replace the relay.
 Relay Block Removal/Installation [With Advanced Keyless Entry And Push Button
Start System]
Relay Block Removal/Installation [With Advanced Keyless Entry And Push Button
Start System]
1. Disconnect the negative battery cable..
2. Remove the following parts:
a. Driver-side front scuff plate.
b. Driver-side front side trim.
c. Hood release lever.
d. Upper panel.
e. Shift ...
 Relay Inspection [Skyactiv G 2.0]
Relay Type
Connector type
Part name
Type A
Front fog light relay
Headlight relay (HI)
Headlight rel ...
Other materials:
Glossary of Terms
Tire Placard: A label indicating the OE tire sizes, recommended inflation
pressure, and the
maximum weight the vehicle can carry.
Tire Identification Number (TIN): A number on the sidewall of each tire
providing
information about the tire brand and manufacturing plant, tire size, and date o ...
Interior Light Removal/Installation
1. Disconnect the negative battery cable..
2. Remove the rain sensor cover. (Vehicles with auto light/wiper system).
3. Remove the following parts:
a. Sunroof seaming welt (vehicles with sunroof)
b. A-pillar trim.
c. Front scuff plate.
d. Rear scuff plate.
e. B-pillar lower trim.
f. ...
On Board Diagnostic System Simulation Inspection [FS5 A EL]
1. Connect the M-MDS(IDS) to the DLC-2.
2. After the vehicle is identified, select the following items from the initialization
screen of the IDS.
a. Select "DataLogger".
b. Select "Modules".
c. Select "TCM".
3. Select the simulation items from the PID ta ...
