Mazda 3 Service Manual: Relay Inspection [Skyactiv G 2.0]
Relay Type
|
Connector type |
Part name |
|
Type A |
|
|
Type B |
|
|
Type C |
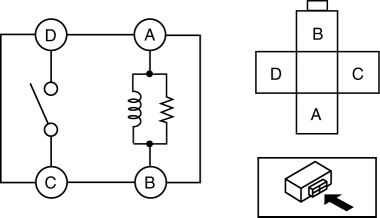
|
|
Type D |
|
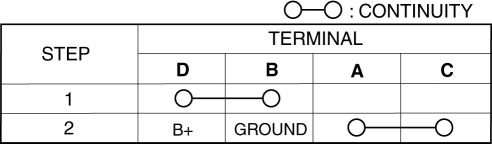
Type A
1. Verify that the continuity is as indicated in the table.
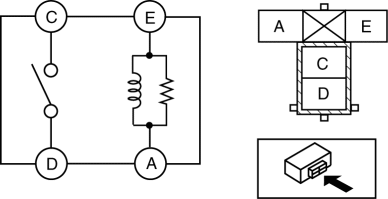
-
If not as indicated in the table, replace the relay.

Type B
1. Verify that the continuity is as indicated in the table.
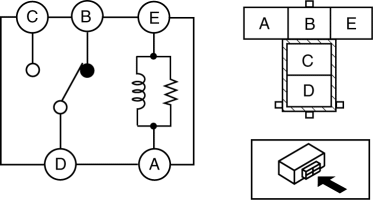
-
If not as indicated in the table, replace the relay.
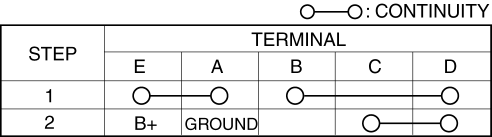
Type C
1. Verify that the continuity is as indicated in the table.
-
If not as indicated in the table, replace the relay.

Type D
1. Verify that the continuity is as indicated in the table.

-
If not as indicated in the table, replace the relay.
 Relay Inspection [Mzr 2.0, Mzr 2.5, Mzr 2.3 Disi Turbo]
Relay Type
Connector type
Part name
Type A
Front fog light relay
Headlight relay (HI)
Headlight rel ...
 Starter Cut Relay Inspection [MTX]
Advanced Keyless Entry And Push Button Start System Only
1. Disconnect the negative battery cable.
2. Remove the following parts:
a. Front scuff plate (LH).
b. Front side trim (LH).
c. Side w ...
Other materials:
Tweeter Inspection
1. Disconnect the negative battery cable..
2. Remove the inner garnish..
3. Remove the tweeter..
4. Verify the resistance between tweeter terminals.
If not within the specification, replace the tweeter.
Resistance
Without Bose®: 3.4—4.6 ohms
With Bose ...
Vacuum Pump Inspection [Skyactiv G 2.0]
1. Pinch open the clamp using pliers and disconnect the vacuum hose from the
vacuum pump.
2. Install the vacuum gauge as shown in the figure, then check the vacuum.
3. Warn up the engine.
If the pressure is less than the specification, inspect for the following.
M ...
No.7 Bsm Indicator Light Does Not Flash While Under Bsm Indicator Light Flashing
Conditions (With Combination Switch Operation (Turn Signal Switch)) [Blind Spot
Monitoring (Bsm)]
7
BSM indicator light does not flash while under BSM indicator light-flashing
conditions (with combination switch operation (turn signal switch))
Description
The BSM indicator light does not flash or illuminate continuously,
...
